
What is Gmail Markup and How to Use It?
Gmail Markup enhances your emails by allowing recipients to take quick actions directly from their Gmail inbox. With this feature, users can interact with emails - such as checking into a flight, confirming an event, or tracking an order - without opening the email fully or clicking external links.
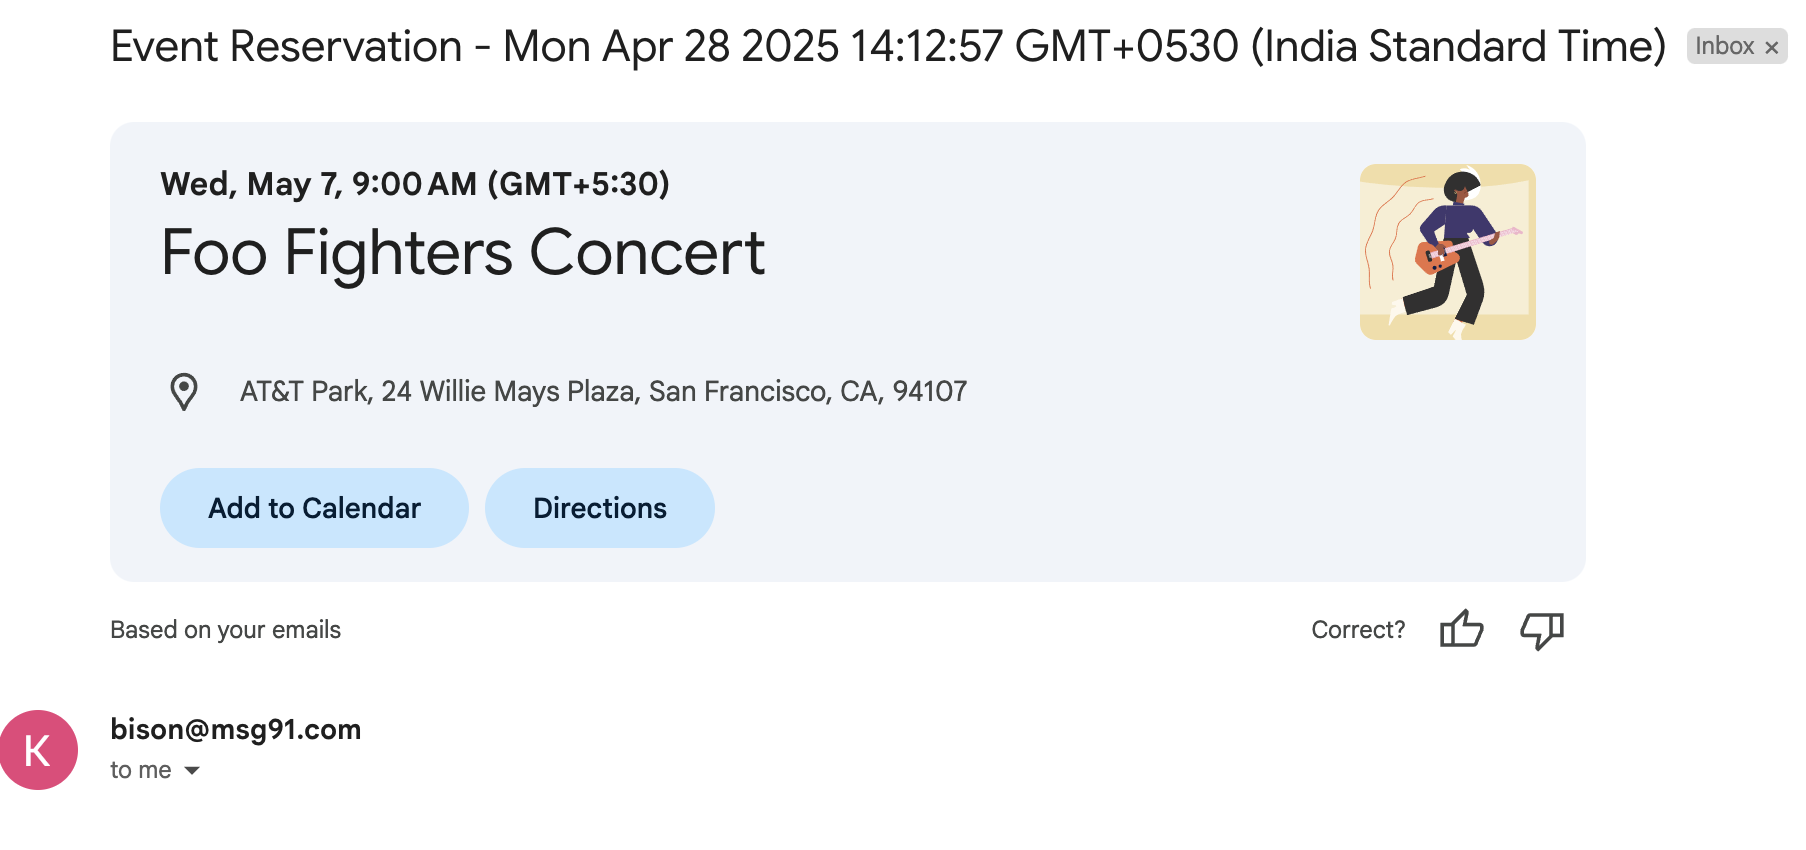
Example Use Case:
For an event reservation email, Gmail Markup can display an "Add to Calendar" button to allow users to add the event to their calendar, and a "Directions" button to get directions to the event directly from their inbox.
If you want to test before whitelisting your email ID, follow these simple steps:
Visit script.google.com
After visiting, select 'New Project' from the left side.
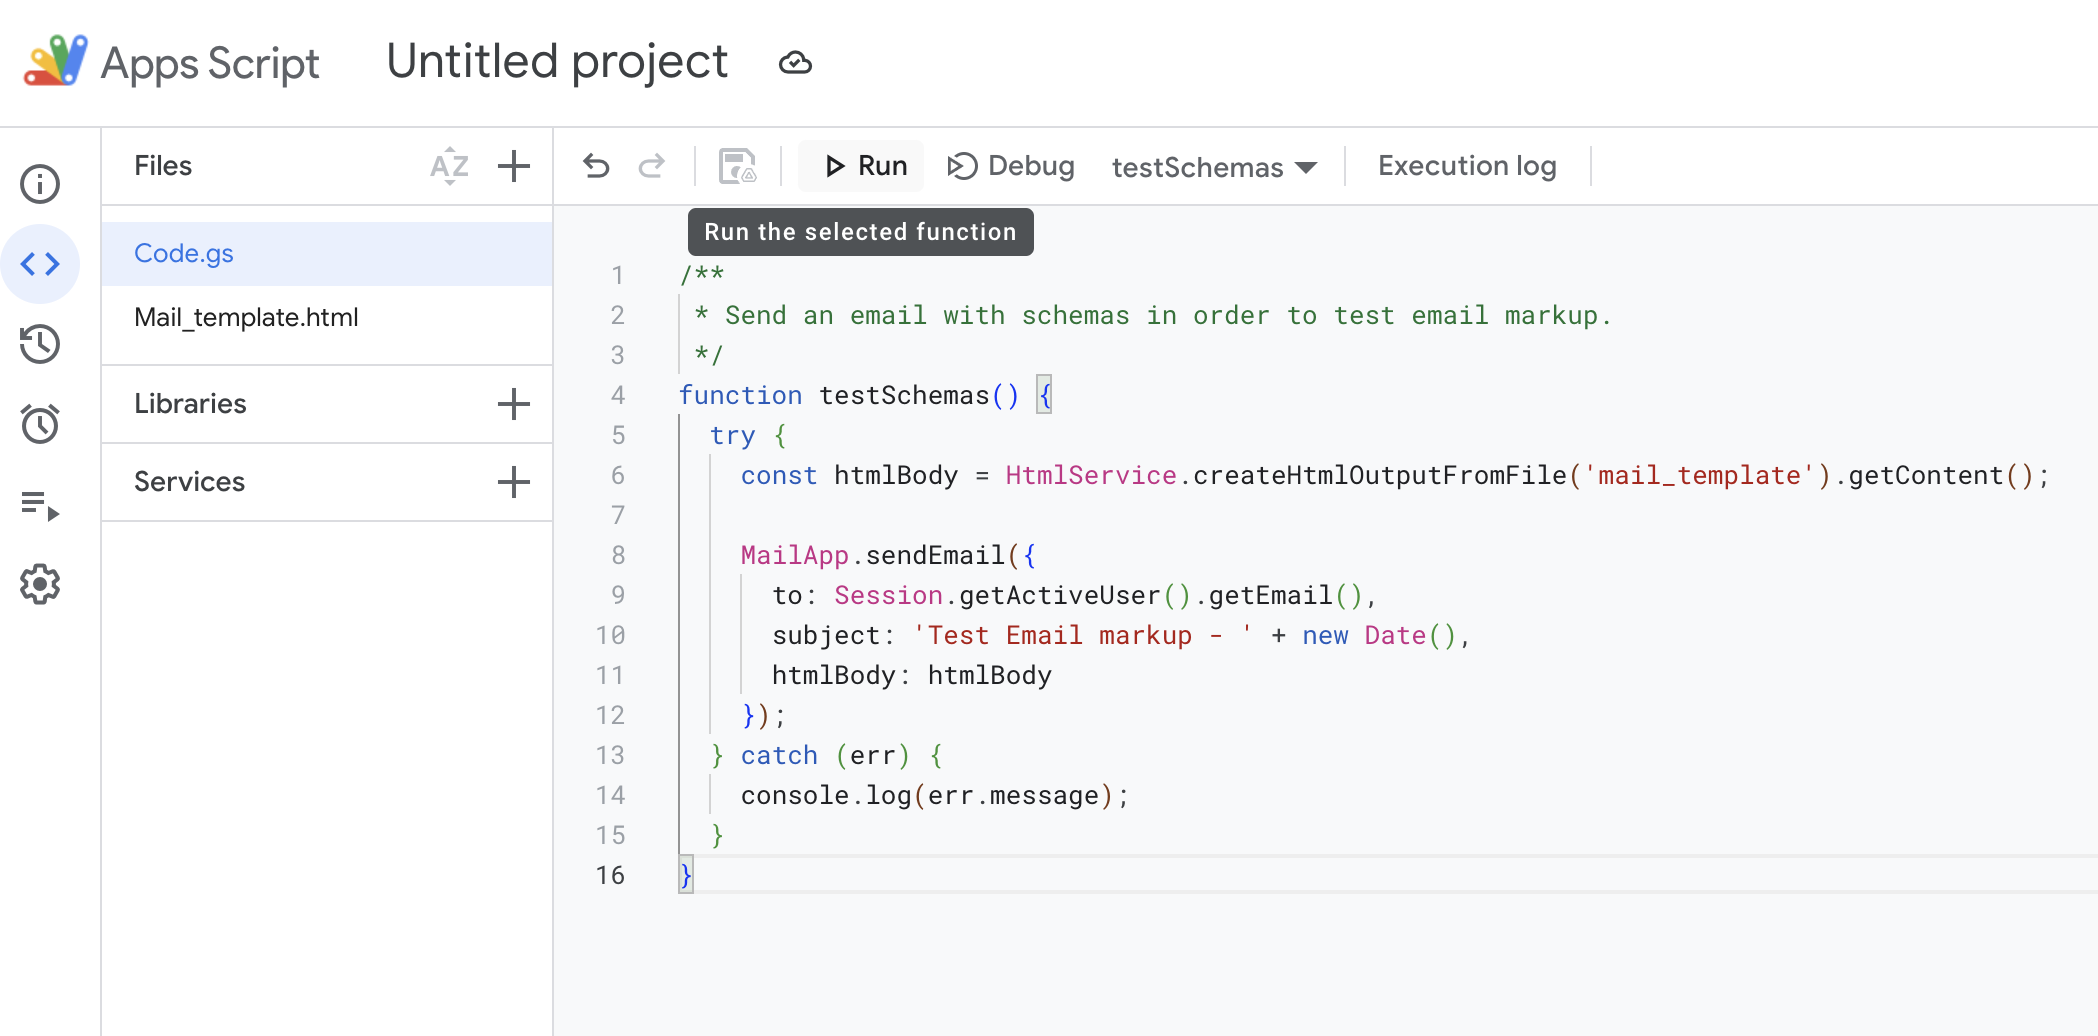
You will see a file named Code.gs on the left side.
Replace the content of Code.gs with the following code.
/**
 * Send an email with schemas in order to test email markup.
 */
function testSchemas() {
  try {
    const htmlBody = HtmlService.createHtmlOutputFromFile('mail_template').getContent();

    MailApp.sendEmail({
      to: Session.getActiveUser().getEmail(),
      subject: 'Test Email markup - ' + new Date(),
      htmlBody: htmlBody
    });
  } catch (err) {
    console.log(err.message);
  }
}
Click on Save
Next, click on the left top side Files (+) icon, select HTML, and name the file mail_template to match the parameter used in the JavaScript above.
Replace the content of HTML with the following code & Click on Save
<!--
 Copyright 2022 Google LLC

 Licensed under the Apache License, Version 2.0 (the "License");
 you may not use this file except in compliance with the License.
 You may obtain a copy of the License at

      http://www.apache.org/licenses/LICENSE-2.0

 Unless required by applicable law or agreed to in writing, software
 distributed under the License is distributed on an "AS IS" BASIS,
 WITHOUT WARRANTIES OR CONDITIONS OF ANY KIND, either express or implied.
 See the License for the specific language governing permissions and
 limitations under the License.
-->

<html>
  <head>
  <script type="application/ld+json">
{
  "@context": "http://schema.org",
  "@type": "FlightReservation",
  "reservationNumber": "RXJ34P",
  "reservationStatus": "http://schema.org/Confirmed",
  "underName": {
    "@type": "Person",
    "name": "Eva Green"
  },
  "reservationFor": {
    "@type": "Flight",
    "flightNumber": "110",
    "airline": {
      "@type": "Airline",
      "name": "United",
      "iataCode": "UA"
    },
    "departureAirport": {
      "@type": "Airport",
      "name": "San Francisco Airport",
      "iataCode": "SFO"
    },
    "departureTime": "2027-03-04T20:15:00-08:00",
    "arrivalAirport": {
      "@type": "Airport",
      "name": "John F. Kennedy International Airport",
      "iataCode": "JFK"
    },
    "arrivalTime": "2027-03-05T06:30:00-05:00"
  }
}
</script>
To test the script:
Select the tab for Code.gs
Make sure the function testSchemas is selected in the Select function dropdown menu.
Click Run in the Apps Script development environment.To test the script:

The first time you run the script, you'll be asked to grant authorization.
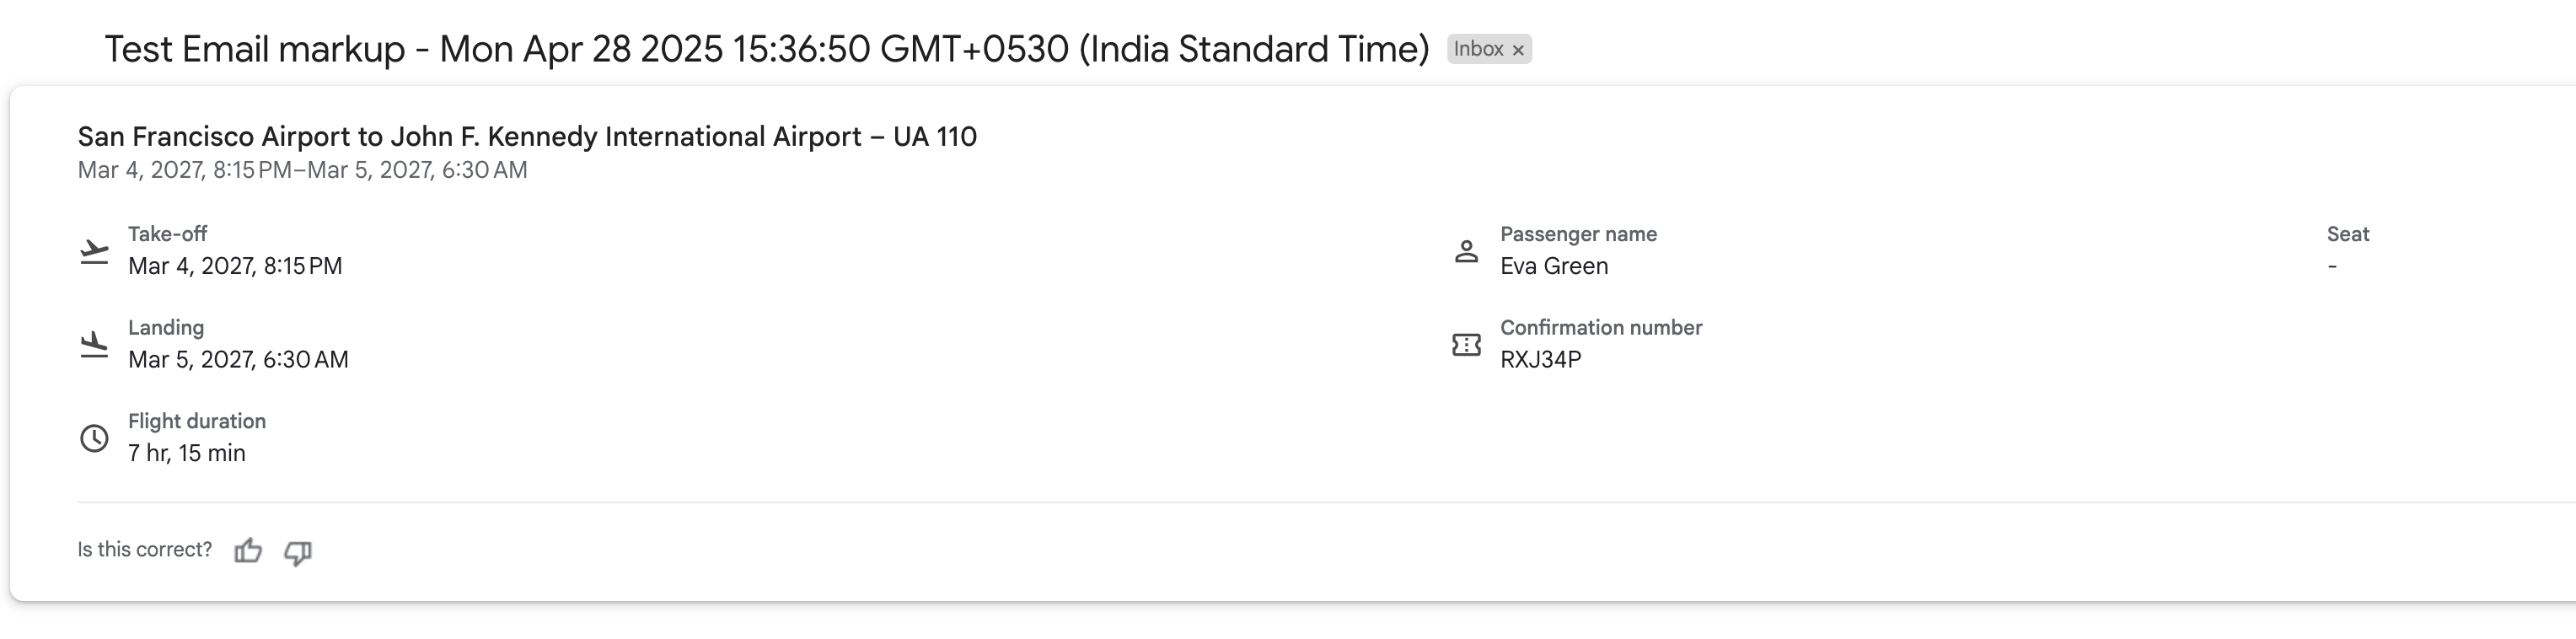
Once you grant the authorization and the script runs successfully, check your inbox for an email sent from yourself — similar to the following screenshot:
If you're planning to use Gmail interactive cards or actions in your email templates, you must go through Google's schema whitelisting process. This guide will walk you through everything in detail,
How to Apply for Gmail Schema Whitelisting (Step-by-Step Guide)
Before starting:
You should have access to your production domain email (like
[email protected])You must have a ready-to-use HTML email template
Step 1: Create the HTML Email Template on MSG91
Log in to your MSG91 Dashboard
Go to Email > Template
Create a new HTML email template using the HTML & Text editor.
Design the email body you want your customer to receive.
Step 2: Choose the Interactive Card (Schema Type)
Google supports a variety of interactive cards, such as:
Flight check-ins
Order tracking
Event confirmations
Appointment reminders
Parcel deliveries
Restaurant or hotel reservations
To see all supported cards and examples: Visit: Gmail Markup Documentation
Note - You can pass multiple parameters as per Gmail Markup documentation. However, what appears in the Gmail preview popup is decided by Google.
Step 3: Add Schema Markup to Your HTML Email
Once you’ve choosed the interactive card:
Select the card on the Gmail Markup Documentation
Copy the JSON-LD schema code (starts with
<script type="application/ld+json">)In your Msg91 HTML Email, paste this code after the
<head>tag.
Tip: Make sure to:
Replace all
sample valuesin the schema with your actual data or Handlebars variables “{{var}}”Do not remove the “provider” section – it’s mandatory
Step 4: Validate Your Schema Code
Use Google’s Email Markup Tester to confirm everything is correct.
Go to Email Markup Tester
Paste the entire HTML email code
Replace variables with real sample data
Click Validate
If it shows “No errors detected,” you’re good to go.
Step 5: Test Your Email Schema via Google Apps Script
You can also test how your schema looks in a real Gmail inbox.
Click New Project
You will see a file named
Code.gs. Replace its content with the following:
/**
 * Send an email with schemas in order to test email markup.
 */
function testSchemas() {
  try {
    const htmlBody = HtmlService.createHtmlOutputFromFile('mail_template').getContent();

    MailApp.sendEmail({
      to: Session.getActiveUser().getEmail(),
      subject: 'Test Email markup - ' + new Date(),
      htmlBody: htmlBody
    });
  } catch (err) {
    console.log(err.message);
  }
}
Click Save.
Click the
+icon → Choose HTML → Name the file asmail_template.Paste the validated email template in this HTML file.
Click Save.
Go back to
Code.gs→ Select functiontestSchemas→ Click Run.
After successful execution, you'll receive the interactive markup email in the Gmail inbox of the account you used to log in to App Script. Please check only that email ID. If everything appears correctly, proceed to Step 6
Step 6: Send Schema Email from MSG91 to Google
Now as your email template is tested and validated, it’s time to send the real email to Google for whitelisting.
Open your email template in MSG91.
Before sending, make sure:
You are using your actual production email address (e.g.,
[email protected]).The schema (JSON-LD code) is correctly placed after the
<head>tag in the HTML template.All dynamic variables are properly mapped in the HTML code.
The email you send should be the final version that your customers will receive.
Submit the email template for approval within MSG91.
This approval usually takes around 30 minutes.Once approved, go to Send Email:
Set the recipient email to:
[email protected]Select your validated template.
Fill in all variable values with actual data
Ensure the “From” email domain (e.g.,
@yourcompany.com) matches your business domain or subdomain.
❗ Do not use an email from a generic domain like Gmail or Yahoo.Choose the email address you want to whitelist in the “From” section, making sure it includes your business domain—for example, [email protected].
Send the email directly from MSG91.
Important Notes:
Do not use a testing domain or sandbox email address.
Do not forward this email — it must be sent freshly and directly from MSG91.
Step 7: Submit Google Whitelisting Form (Final Step)
Visit the Gmail Schema Whitelisting Form - Gmail Whitelist Request Form
You’ll be asked for the following:
Important Guidelines
No Promotional Content: Google does not approve schemas for promotional or marketing emails
Use Production Email & Domain
Wait Time: Approval takes between 7 days to 3 weeks
After submitting, Google will manually review and respond to your request. Once approved, your email ID is whitelisted to send interactive schema-based emails via MSG91.
If you have whitelisted your main domain, then you need to use that main domain to send the markup mail.