How to add MSG91 as an Email Service Provider in Clevertap

2. Click on the Channels section from the sidebar go to the Email.

3. Now click on +Provider.

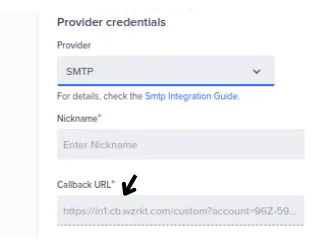
4. And choose SMTP as the provider -

5. After choosing SMTP as the provider fill out the required fields

- Nickname: Enter “MSG91”.
- Host (SMTP Hostname): Add from MSG91 Panel> Email > Choose Domain > SMTP.
- Port: Add the port number provided by MSG91 for SMTP communication.
- Scheme: Select SMTP.
- Username: Enter the username associated with your MSG91 account or the SMTP credentials provided by MSG91.
- Password: Add the password associated with your MSG91 account or the SMTP credentials provided by MSG91.
- From Address: Specify the email address you want to use as the "From" address for your outgoing emails.
- Reply Address: Enter the email address where you want recipients to send their replies.
- Unsubscribe Page (optional): If you have a dedicated page for recipients to unsubscribe from your emails, you can enter the URL of that page here.

7. Copy the callback URL from Clevertap and configure the webhook in the MSG91 Dashboard, following these simplified steps:
- Copy the Callback URL: In Clevertap, find the "Callback URL" and copy it.

- Access Email Settings in MSG91: Look for the "Email" section in the dashboard menu.
- Configure Webhook: Find the "Webhook" option within the email settings.

- Paste the copied Callback URL from Clevertap into the "Get Delivery Report via Webhook" field.
- Save the changes in MSG91 to complete the webhook configuration.

8. Check delivery by clicking on the “Send Test Email” on Clevertap.
By clicking on "Send Test Email" in Clevertap, you can evaluate the delivery and appearance of the email campaign specifically for the test recipients. This allows you to ensure that the email content, formatting, and any personalization are correct before sending the campaign to your entire audience.
9. Once you successfully receive the test email, Save the configuration in Clevertap.

After confirming the successful delivery of the test email, make sure to save the configuration to apply the changes made. Saving the configuration ensures that the updated settings and preferences for the email campaign are retained and ready for further action.
1663832908583941.png)