1663832908583941.png)
HOW TO CREATE FLOW
A Flow refers to a predefined sequence of actions and interactions that define the behavior of voice calls. These flows are designed to automate and manage communication processes over the phone. Our Flows typically consist of several key components, including initiation triggers, destination numbers, webhook and decision points, voice messages or playback files, response actions, call scheduling, and time conditions. The flow's purpose is to guide the caller through a structured experience, whether it's interacting with an automated system (like an Interactive Voice Response or IVR system), receiving important notifications, participating in surveys, or engaging in various other voice-based communication scenarios.
After logging in MSG91 Account get into Voice Panel. Once you are in the voice services panel, for creating a playback you have to click on the Files option, then click Add File at the top right corner. Select the type of file you want to upload: Upload (wav format only), Text to speech » select voice name
These will be the recordings you can create as per your requirements.

Add Files
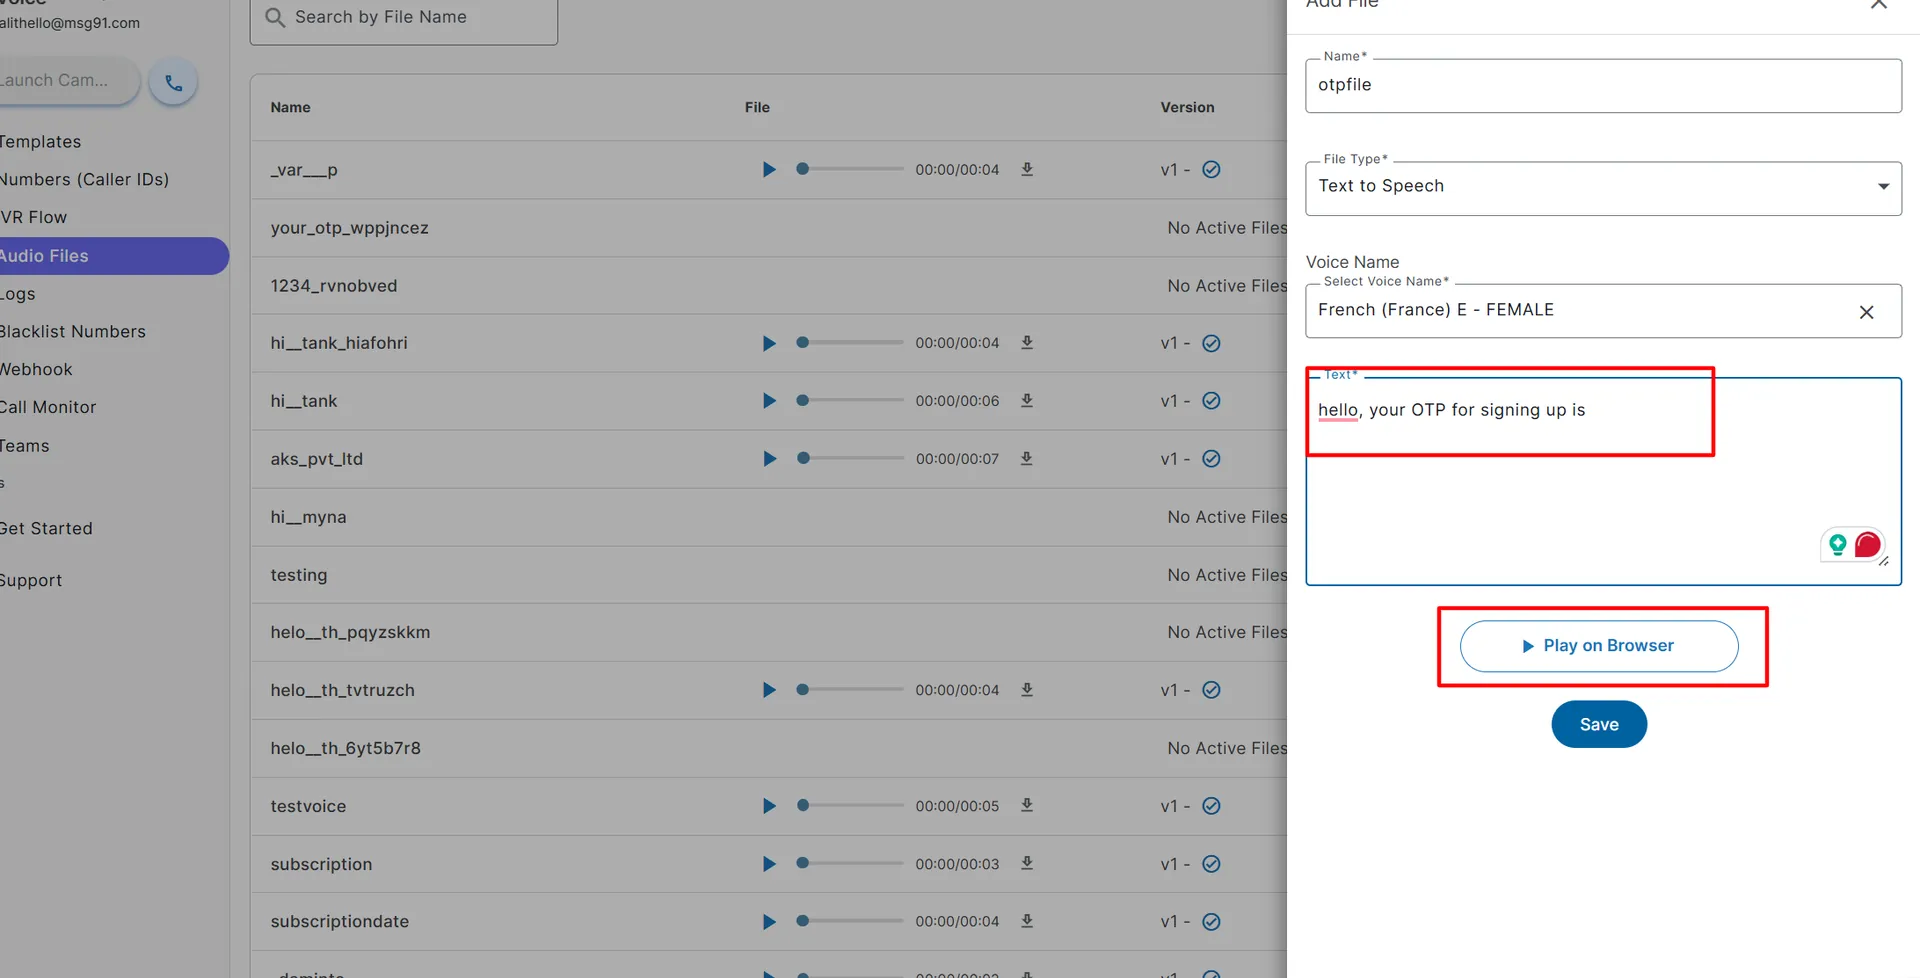
Select Voice Name, the language of the audio file, and then click Save. In the text just write the content of the message no need to pass any variable in the content and then just save the file After the file is added, it can't be deleted, but it can be edited or renamed.
Add Templates
Now you can create a Template. The option is at the top right corner. When you create the template just give the name of the template. After adding the template name. You can assign variables in the message first you have to create the files Use @ to add files and # to add variables (variables can be numeric and Dynamic too).
Select the variable type as number or currency and check the box of “as digit” if you want the numbers in the variable to be played individually.

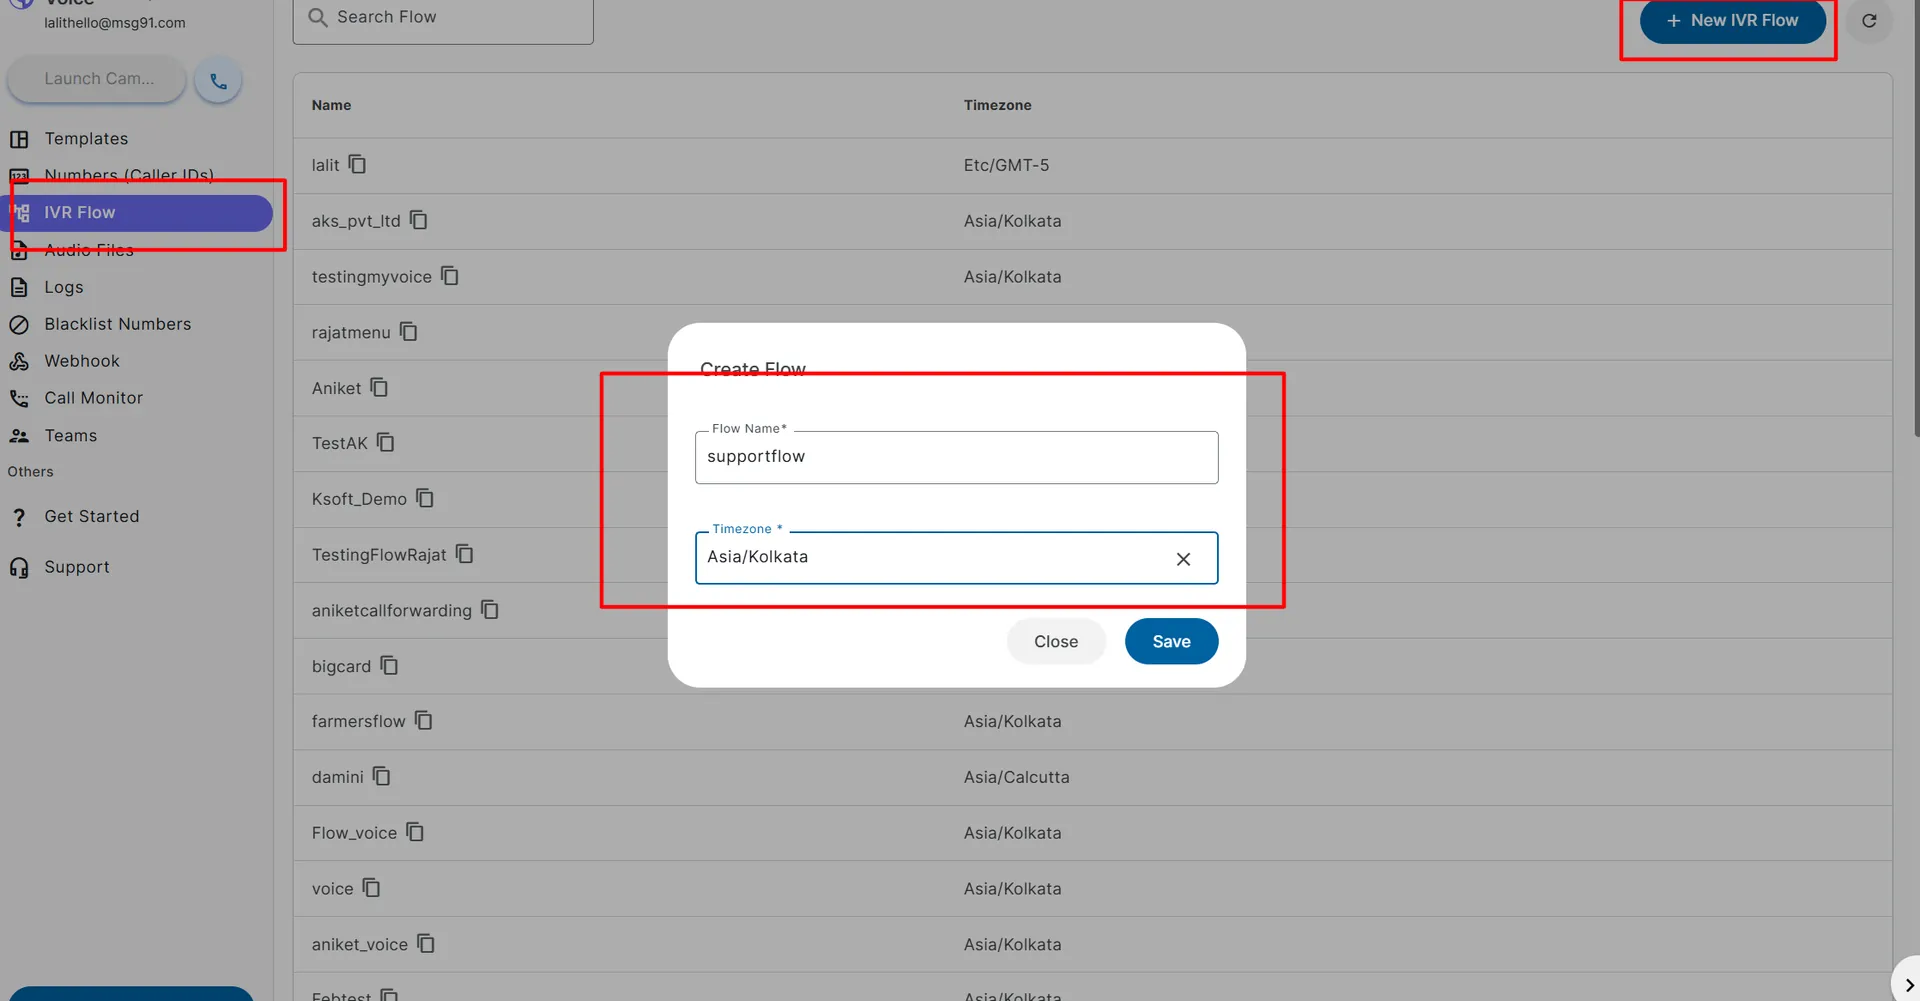
Now go to IVR flow and create a new flow by entering your flow name and timezone:
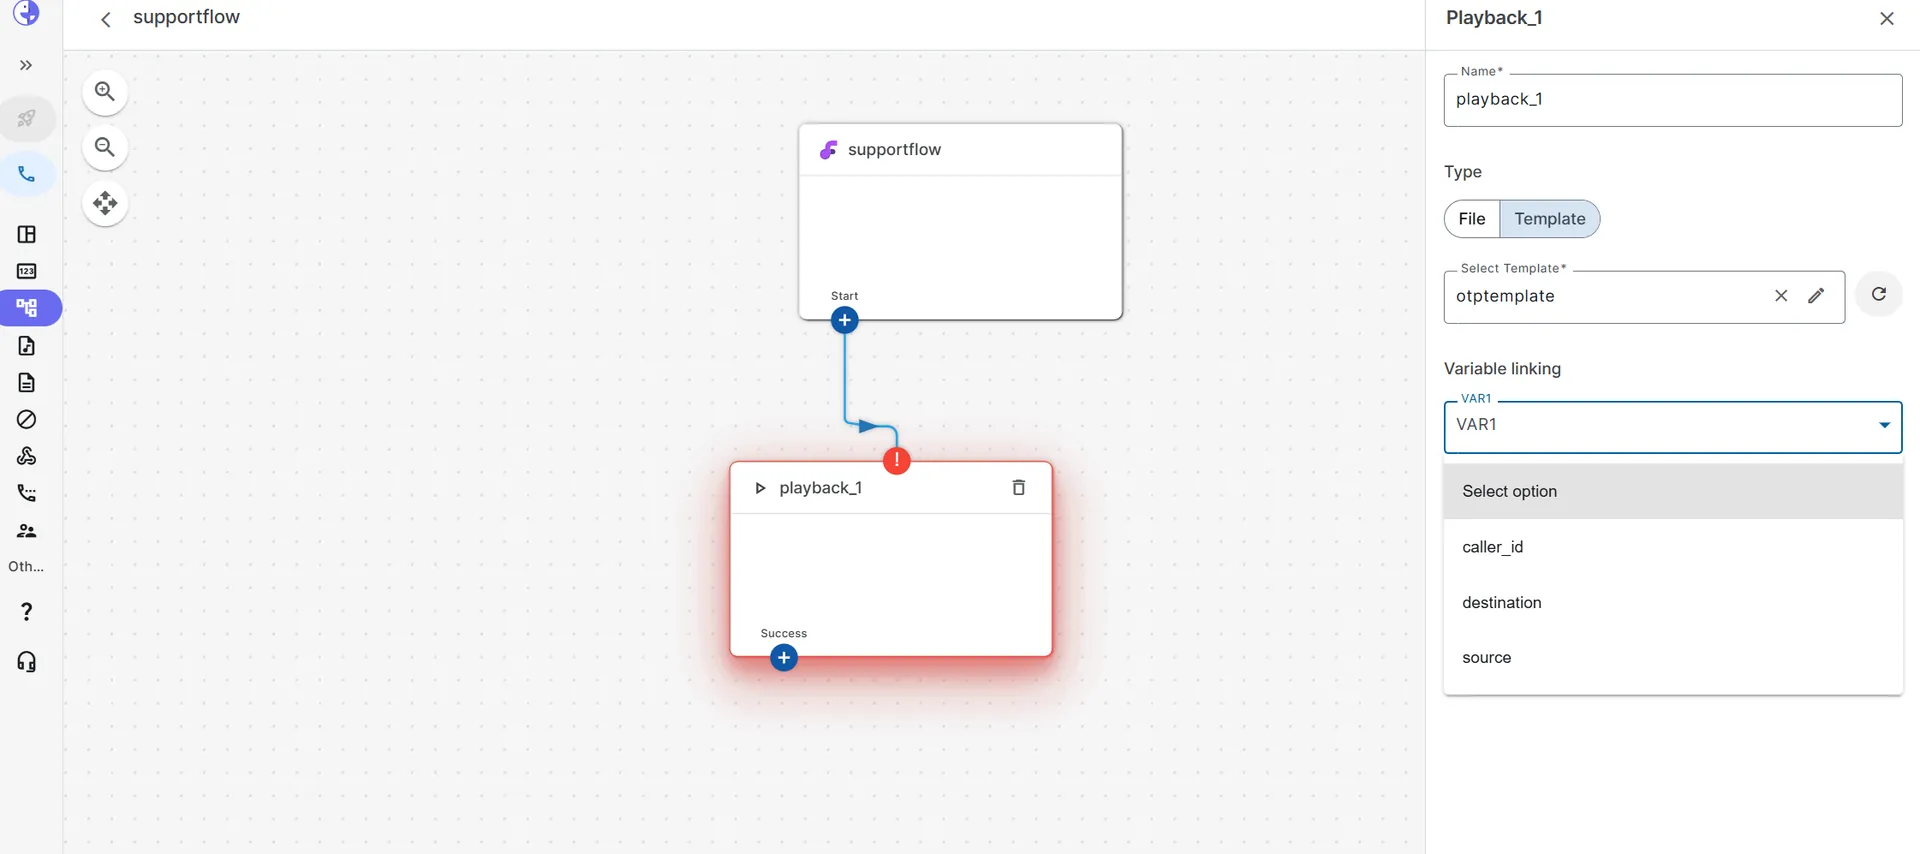
You can add template or file in flow from the Number Input Node and Playback Node in order to play IVR files. Templates can also play dynamic variables.
Template In Flow
In addition, you can use the Flow option to create a customized workflow that matches your specific business needs. You can also apply various conditions to it. These nodes collectively enable you to design a dynamic and efficient call flow according to your specific business, ensuring callers are handled with precision.
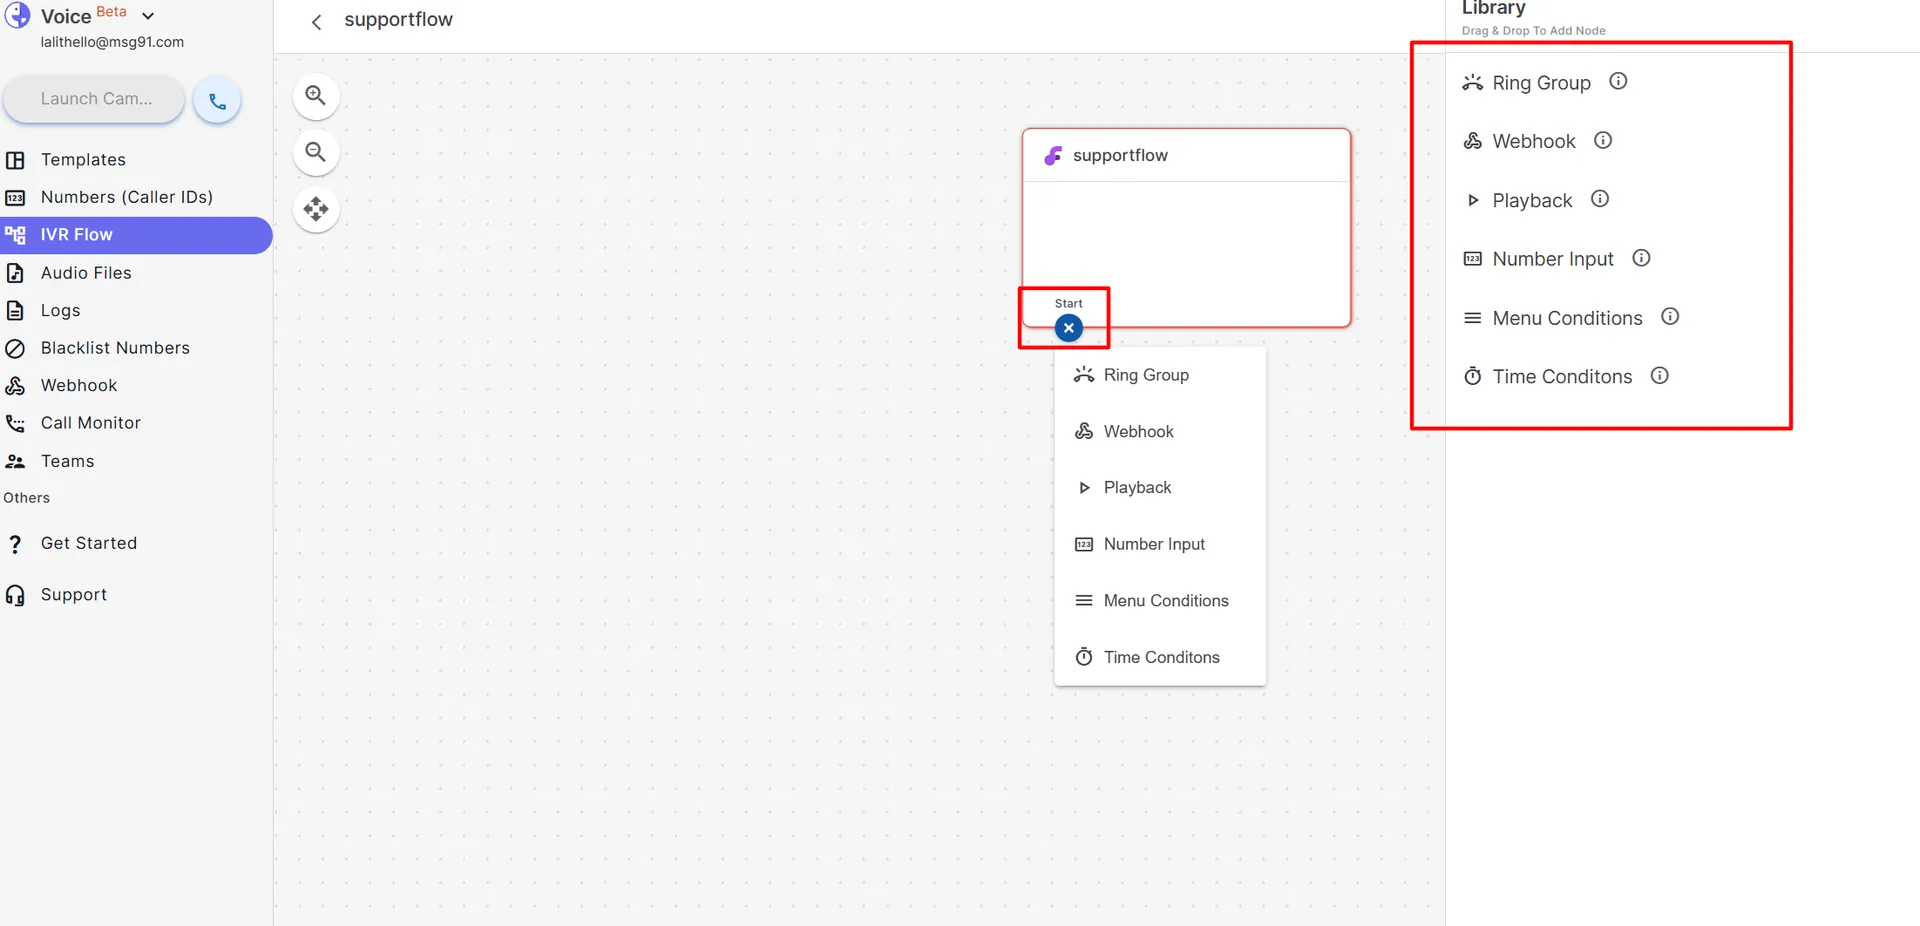
Here are descriptions of the nodes along with practical use cases:
1.)Ring Group Node:
A "ring group" typically refers to a feature in telecommunications systems or call center software where incoming calls are routed to a group of phone numbers, and they ring on multiple devices simultaneously or sequentially until one of them answers the call. The Ring Group node is a fundamental component of your call flow.
It offers two essential options:
1.) Team : Within this system, you have the flexibility to allocate the incoming call or message to a specific team. This team can be conveniently established within the HELLO platform, tailored to suit your organizational structure and needs.
2.) Agent : You also have the liberty to designate a particular agent from your company to handle the incoming communication. The agent chosen should ideally be the one most suited to address the inquiry or matter at hand.
Initially, when someone contacts your company, the communication will be directed to the designated agent's HELLO panel. It's important to note that if an agent has multiple caller IDs, they must ensure they've selected the appropriate one to respond effectively. In case the call or message remains unanswered on the HELLO panel, the system seamlessly forwards it to the agent's mobile phone. This ensures that customer inquiries receive the attention they deserve, even if the agent is not at their desk.
**Drag and drop the node and connect the node as per your requirement.
**Select to whom you want to assign and save.

Ring group Node
2.) Playback Node:
This node serves the purpose of incorporating a playback file within your communication flow. The Playback node enables you to incorporate audio playback into your call flow. You can add any recorded approved file. It provides you with a selection of currently active files available in the dropdown menu.
You can also add Template in this node for Dynamic Variables.
Important Note: It's essential to be aware that the Playback Node should not be utilized for DTMF (Dual-Tone Multi-Frequency) input playback scenarios. This is because, in such cases, the playback will not automatically pause if someone inputs DTMF tones during the playback.
**You have to drag and drop the node and connect it as per your requirement.
**Select a file for Playback.
**Select a Template for Playback with variable.
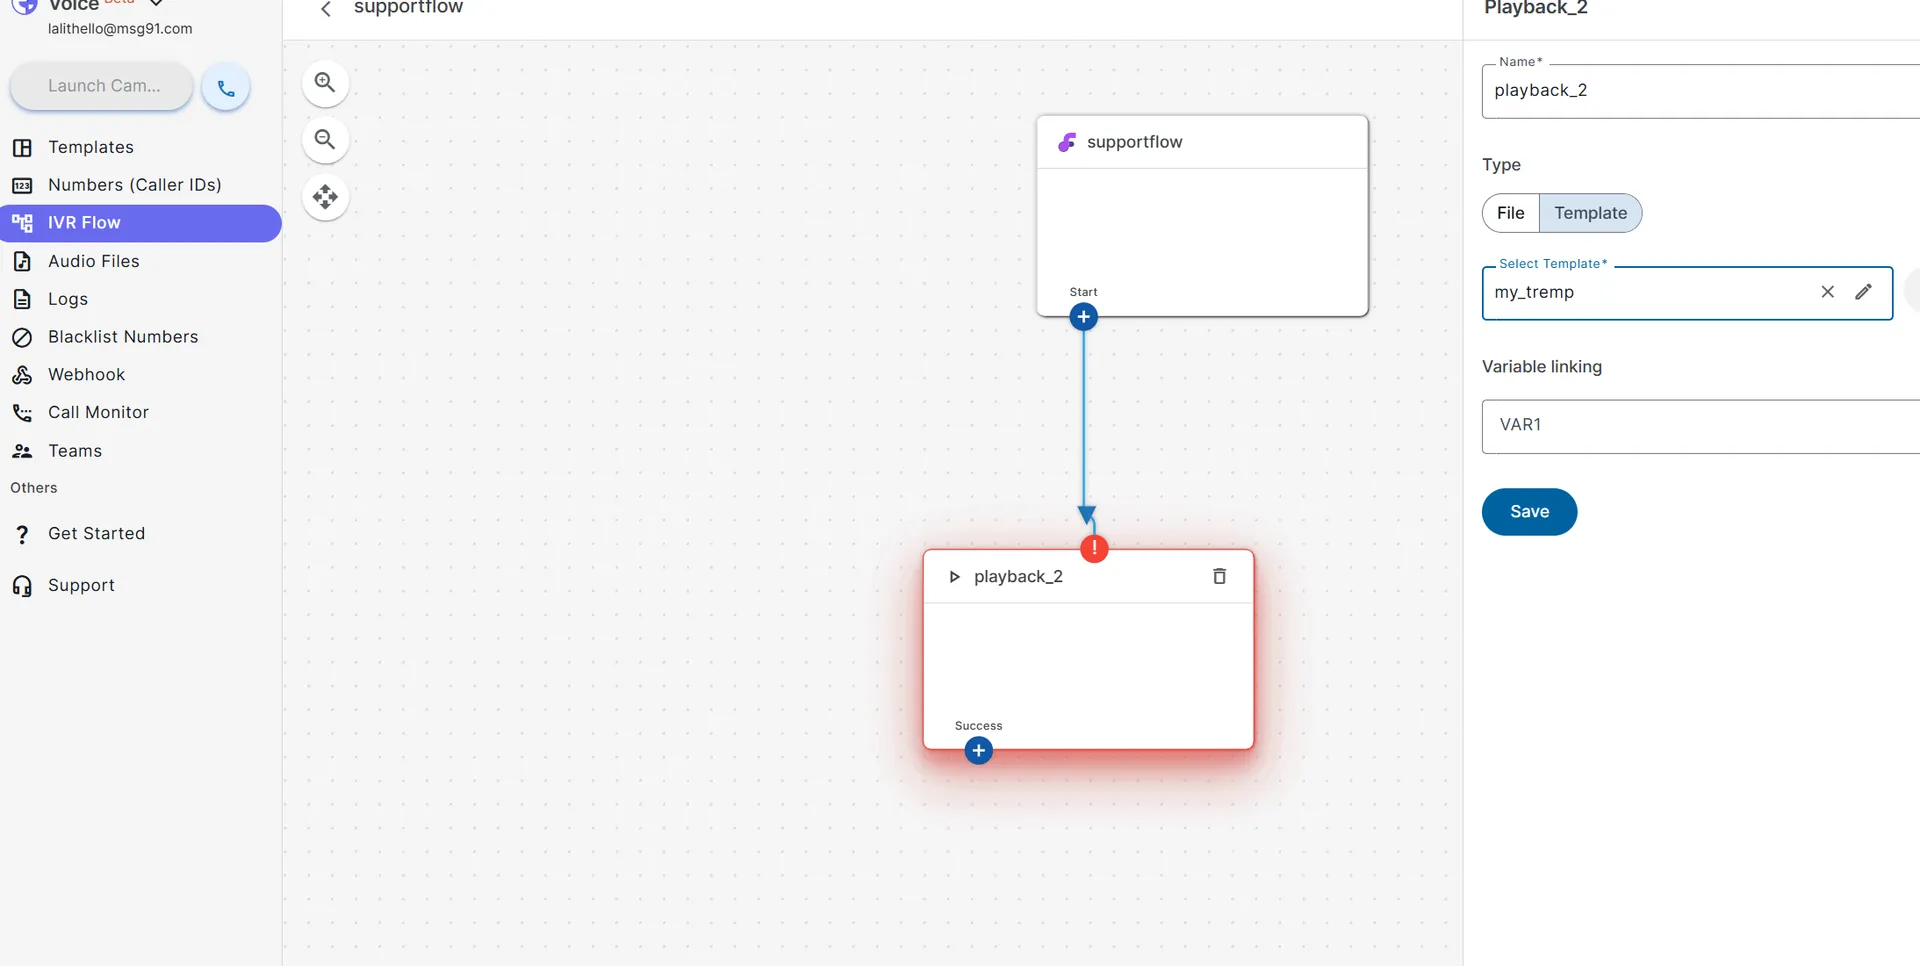
Playback Node
3.)Number Input Node: The Number Input Node is a valuable tool designed for the collection of Dual-Tone Multi-Frequency (DTMF) inputs during communication flows. It offers a range of customizable settings to enhance your interactive communication with the audience. By using the Number Input Node and configuring these settings to your preference, you can create engaging, interactive communication flows that are responsive to your audience's input, and that guide them through the process with clarity and flexibility.
Here are the four fields associated with the Number Input Node:
1.Filename: This field allows you to specify a playback file that will accompany the DTMF input process. You can set an audio file to play as guidance or instructions to users, providing a informative experience.
2. Wait Time: The 'Wait Time' parameter defines the duration for which the system will patiently await a DTMF input from the user. It ensures that users have ample time to respond without feeling pressured.
3. Max Digits: With the 'Max Digits' field, you can set the maximum number of digits allowed in the DTMF input. This parameter allows you to control the length and complexity of user inputs, ensuring they align with your specific requirements.
4. Attempts: The 'Attempts' field determines the number of opportunities you're willing to provide to the user for submitting their DTMF input. It's a safeguard for possible errors or retries, gives users a user-friendly experience.
**Drag and drop the node and connect it as per your requirement.
**Add file and select preferable option from the given options.
**You can also add template in number input node.
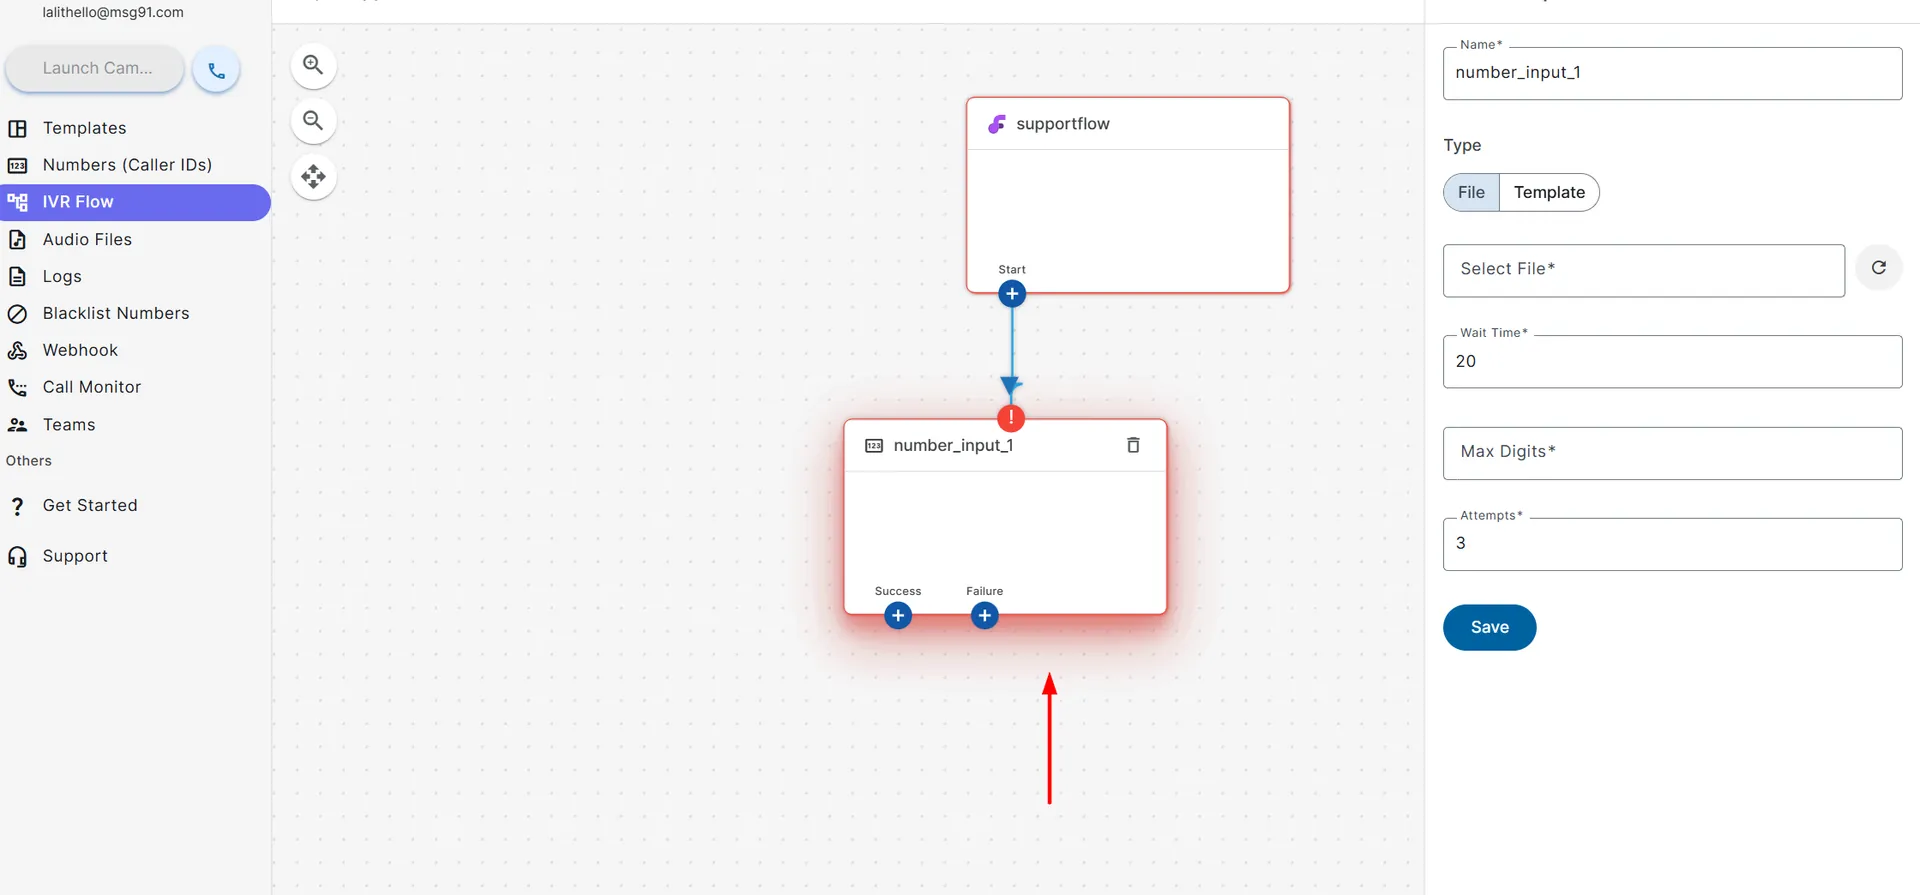
Number Input Node
4.) Menu Conditions Node: The Menu Conditions Node serves as a important element in your flow, enabling the creation of conditional ways. This node is specifically designed to receive input from the Number Input Node, then guide the flow through various conditions based on the user's input. In cases where no matching condition is met, the flow defaults to a predefined condition. By configuring the Menu Conditions Node with your chosen input variable and associated conditions, you can create dynamic communication flows according to users' specific choices and requirements.
Here are the two key fields within the Menu Conditions Node:
1.) Input Variable: This field presents a dropdown menu containing available input variable nodes. You can select the input variable node that corresponds to the user's input, which is taken from the Number Input Node. This selection helps the system identify and work with the user's response.
2.) Equals To: The 'Equals To' field is where you define the specific conditions you wish to apply. After entering your condition criteria, simply click the plus (+) button to add multiple conditions. These conditions act as the navigational signposts, directing the flow along divergent paths based on the user's input.
**Drag and drop the node and connect accordingly.
**Select the Input variable and add more numbers with + sign.
5.) Time Condition Node: In MSG91 flow the Time Condition Node is a powerful tool that allows you to define specific time-based criteria within your communication flows. It enables you to control when and how your flows are executed based on time-related conditions. With the Time Condition Node, you can craft communication flows that are finely tuned to the time of day and days of the week, ensuring your interactions with users are precisely timed and aligned with your business or service hours.
Here are its key features:
1.Days: This field lets you select the days of the week during which the time condition will be active. You can choose one or more days, depending on your specific requirements. For instance, you might want your flow to behave differently on weekdays compared to weekends.
2.Start Time: The 'Start Time' setting determines the beginning of the time window during which the condition is in effect. You can specify the time at which you want the condition to become active. This allows for precise control over when your flow starts responding to particular conditions.
3.End Time: The 'End Time' setting marks the conclusion of the time window during which the condition applies. You can specify the time at which the condition should no longer be in effect. This is essential for defining the duration during which your flow follows the specified conditions.
4.)Plus Sign (+): The plus sign (+) is used to add multiple time conditions. It allows you to create complex time-based rules by specifying different days, start times, and end times for various scenarios. This feature empowers you to create highly flexible and responsive flows that adapt to a wide range of time-related situations.
**Drag and drop the node and connect according to your need.
**You can add many time condition by clicking + sign.
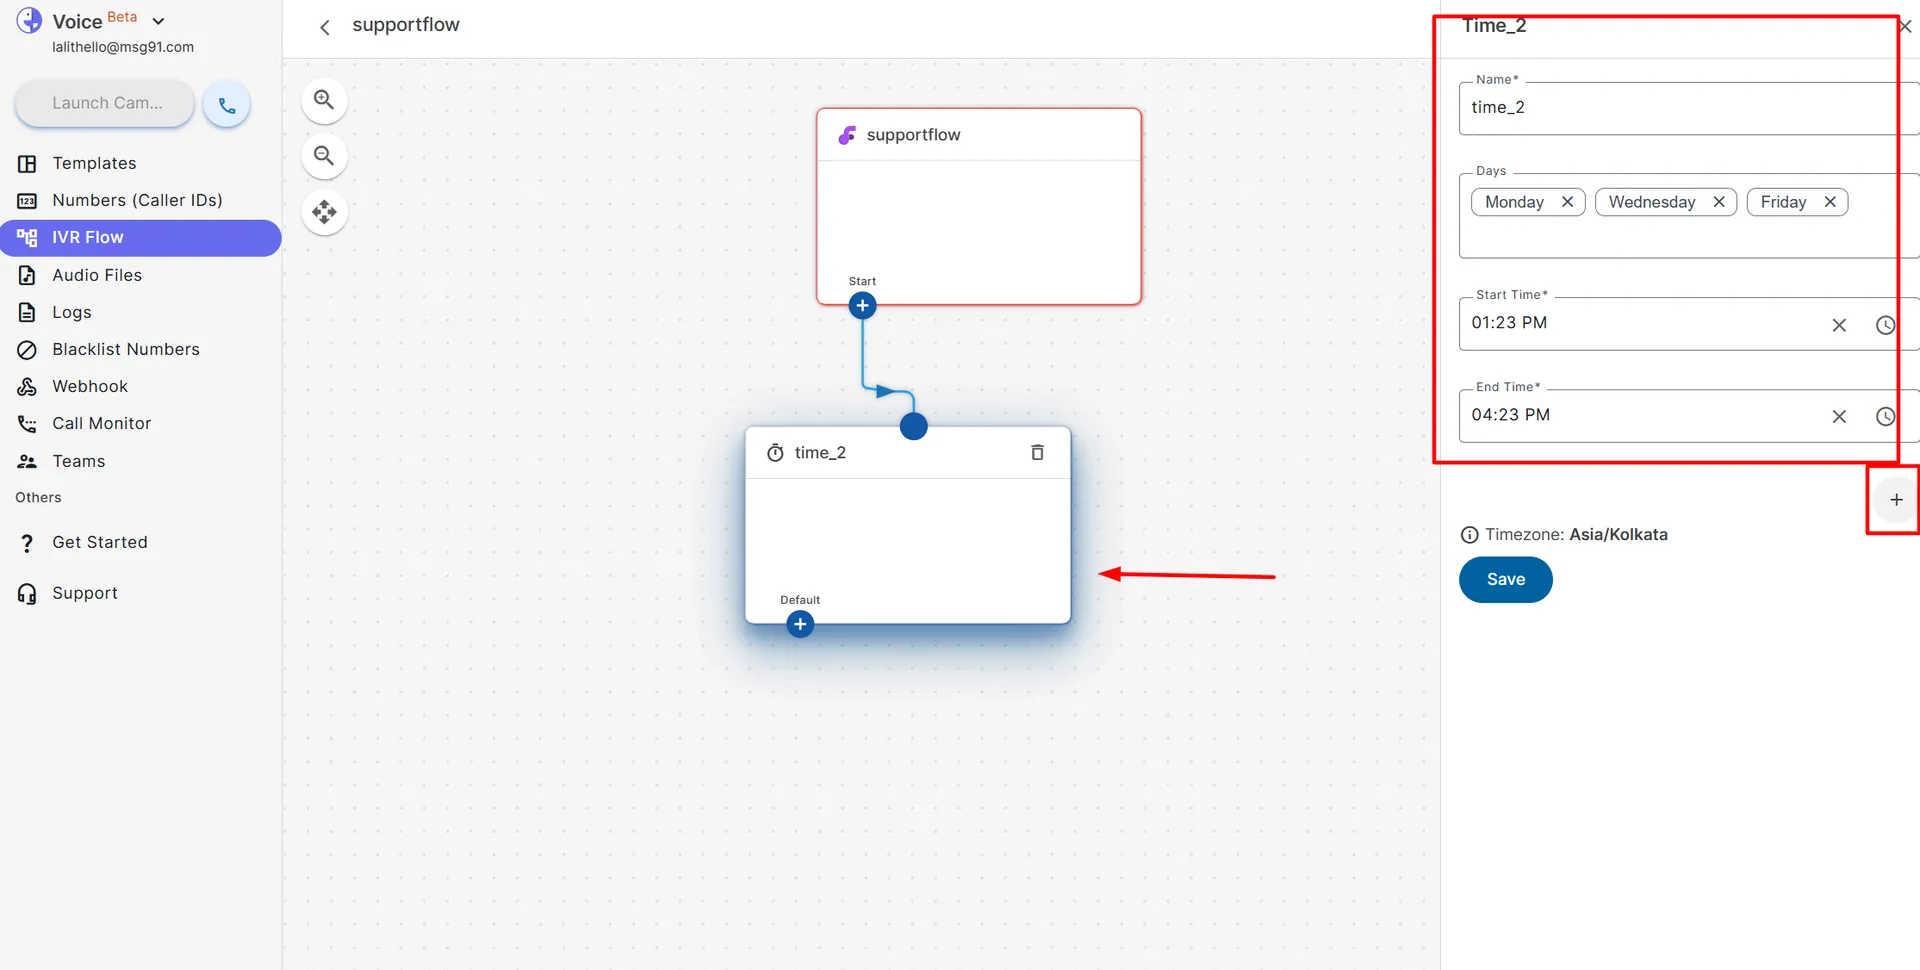
Time Condition Node
6.) Webhook: With this node, you can receive real-time data by specifying your desired Webhook URL. Please use the following JSON format to provide the necessary information, apart from variables in flow you can pass additional parameters as well:
Request body (example):
{
"dest": "#destination",
"number": "#number_input_1",
"source": "#source",
"caller_id": "#caller_id",
"campaign": "testcampaign"
}

The response that you will get on the Webhook is shown in the screenshot below:

The response index is used when you want to use level-wise response index/key of the Webhook response to take further actions. Here you need give the level-wise response index/key separated by '|'
For example please refer to below screenshot in which the Webhook response is mentioned and the examples of response index that needs to updated in MSG91 response index field to take further action of the respective values depending on your requirement:

Logs for your voice services can be found in the logs section. The details that will be available there are Time Start, Source, Agent, Caller ID, Destination, Duration, Billing Duration, Charged, Status, Type, Direction, and Recording. You can even use the Filter option in order to sort logs in order to quickly organize your data and find the data that you want.
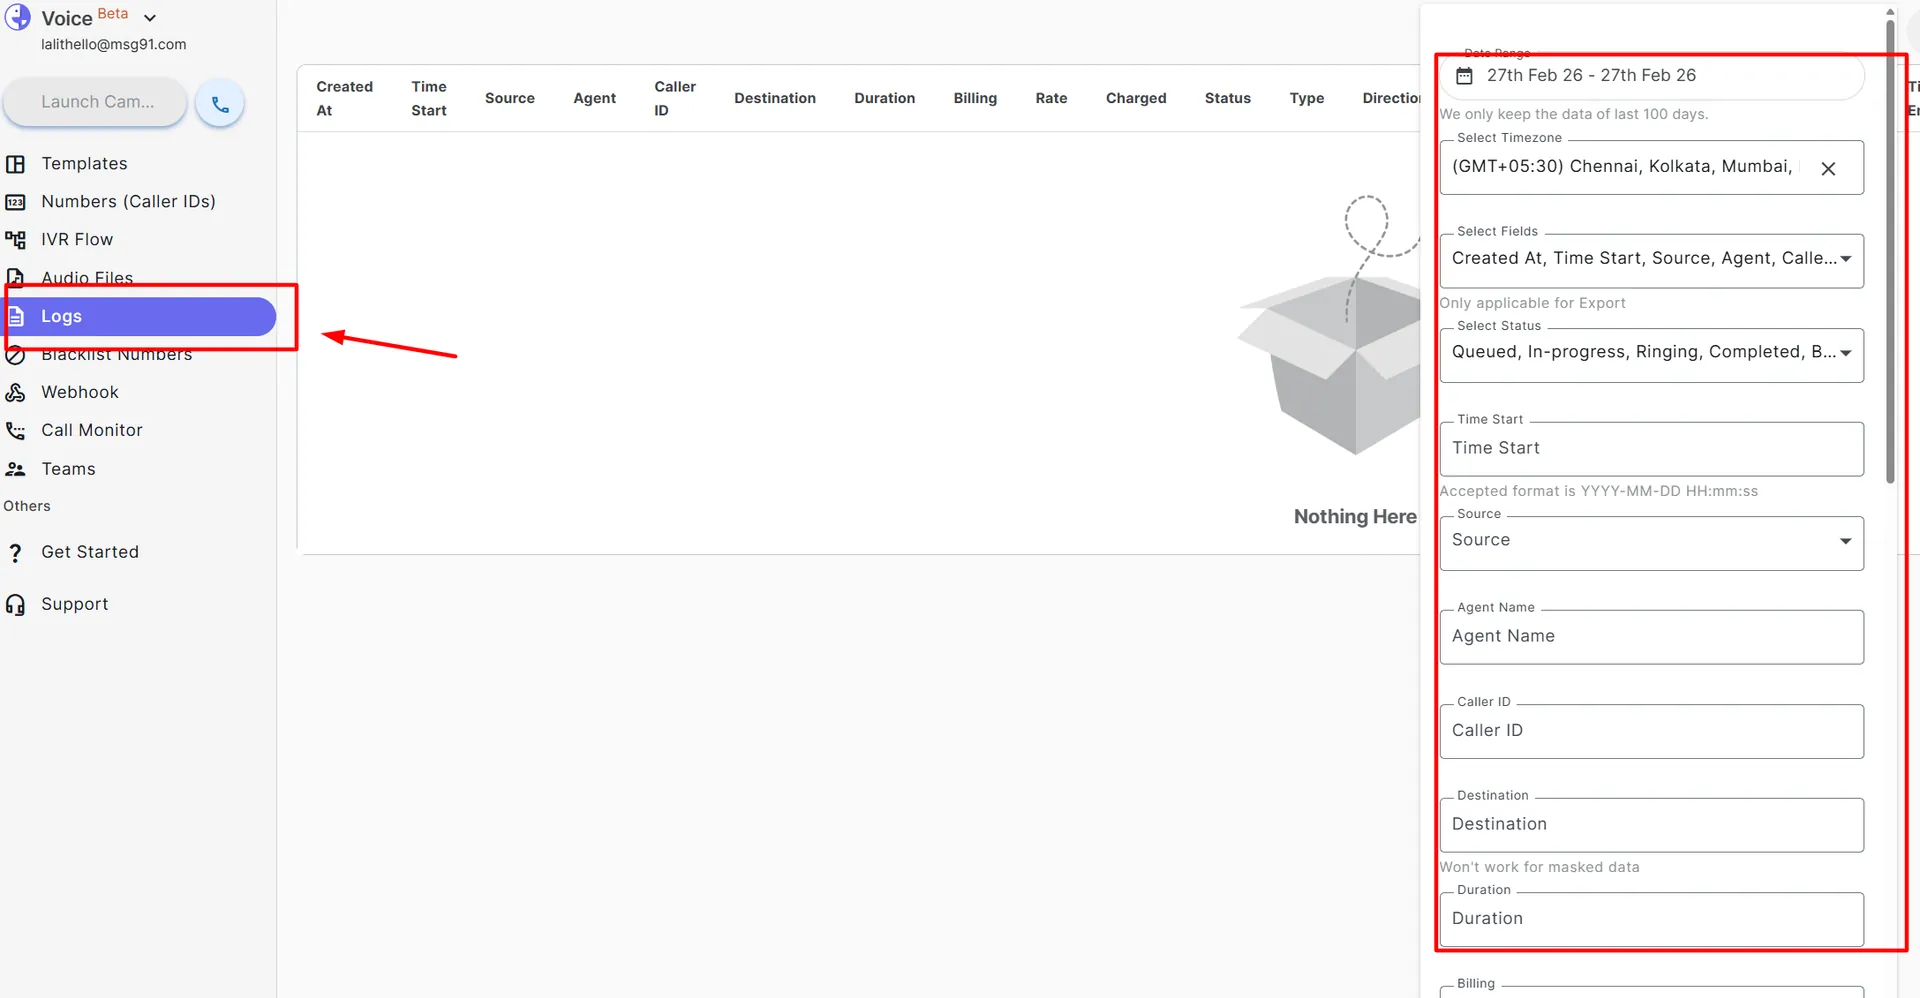
Logs
**Now you can assign the flow to your desired caller ID, and it will work smoothly.
Call Flow Display in Logs
This feature gives you a clear view of how each call was handled.
For both incoming and outgoing calls, you'll be able to see the full path the call took — whether it went through an IVR (like a phone menu), a team, or directly to an agent.
This helps you quickly understand:
How the caller reached their destination
Who or what handled the call at each step
Go to logs » IVR Inputs
Scenarios
1. IVR Case
If an agent is assigned to a ring group, show:
“Call to Agent – [Status]”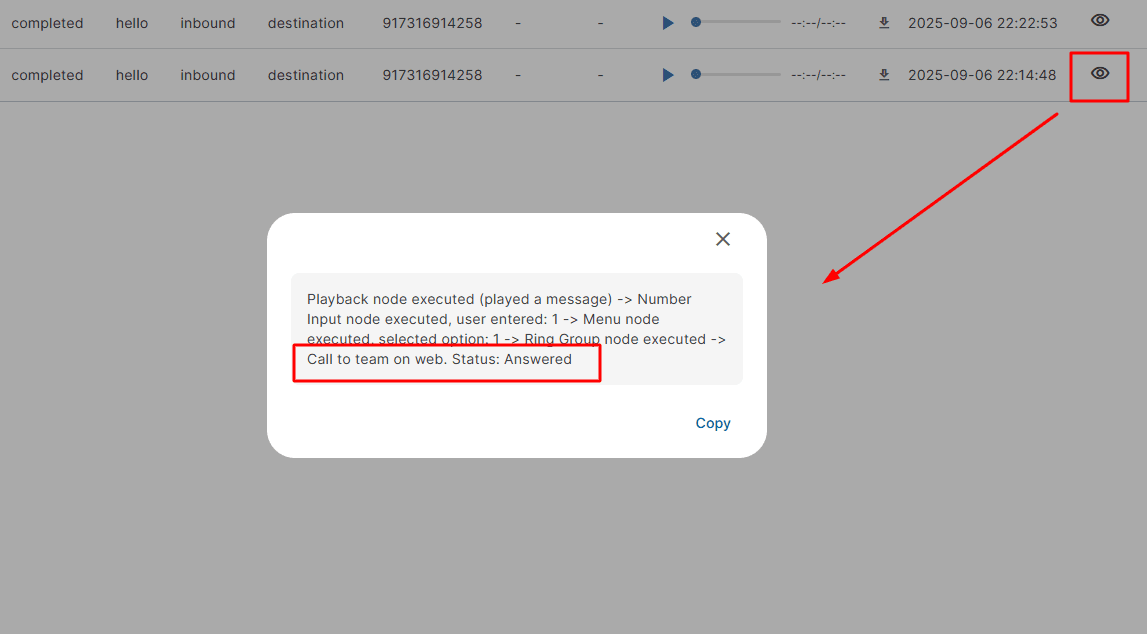
If a team is assigned, show:
“Call to Team – [Status]”If custom is assigned to a ring group, then show:
“Call to custom on phone (number) with statusIf the call is routed to an agent or a team member’s personal number, show:
Agent’s Number with StatusIn this case, the team status will be shown one by one for each member.
For other IVR nodes:
Webhook Node → Show Webhook Response Code
Number Input Node → Show Entered Number
Menu Condition Node → Show Which Condition Matched
Time Condition Node → Show current time of node Executed
2. Team Case
If the call is answered on the web (softphone) → show:
“Call to Team”If the call is answered on the phone of a team member, show:
Team Member’s Number with Status (for all members)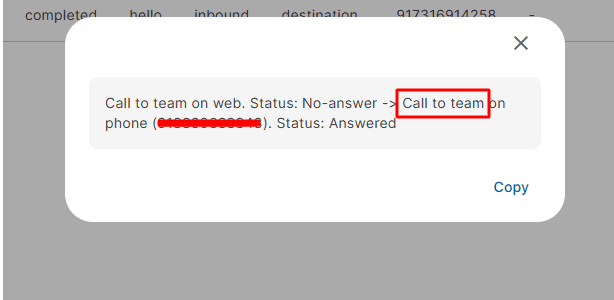
3. Agent Case (Direct Assignment)
If the incoming call flow directly assigns an agent, show:
“Call to Agent”In case of a personal number, show:
“Call to Number”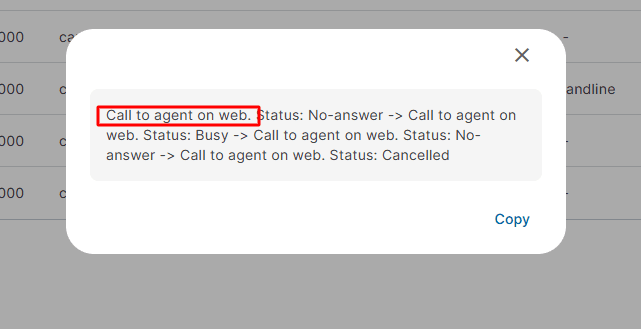
Notes
The feature is only applicable to all incoming calls and outgoing IVR flow.
Logs will be shown in the IVR_input field on the call log section.
Transfer calls will not be shown in the flow.