1663832908583941.png)
MSG91 has introduced a new widget for OTP Login that clients can integrate on their end and all the Send, Resend, and Verify OTP APIs can be called by MSG91 in one place.
To integrate it, follow the below steps -
1. Log in to your MSG91 panel and select the OTP section.

2. This is the only widget where you can view the channels you've used within it and enable or disable their status. Simply click on the Create New Widget to create your own.

3. Give your widget a name.
Select the type of verification that you want to opt for (login using OTP or magic link)
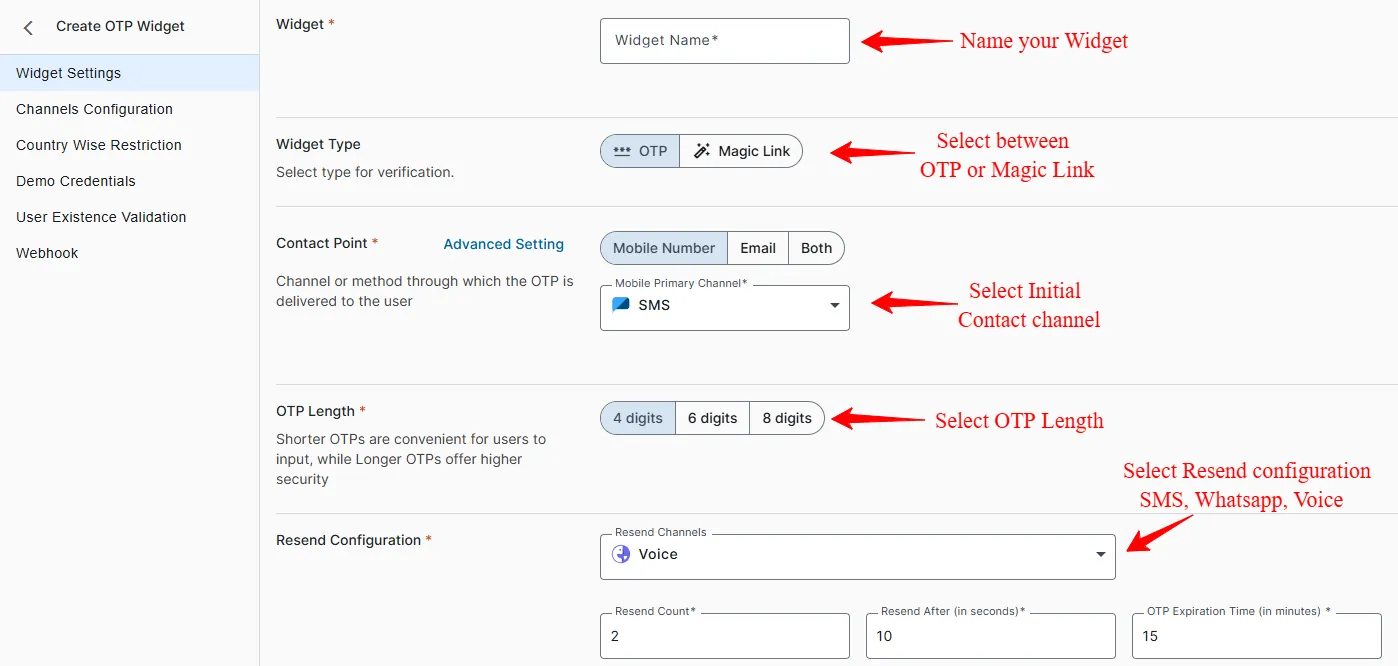
If you are opting for magic link then refer to this link otherwise keep referring to the article shared below
Choose the contact point (Mobile number, Email, or both). Then, pick the primary channel. For Mobile Number as a contact point we have 3 channels available ie, SMS, Whatsapp, or Voice and for Email as a contact point we just have one channel i.e., Email for sending the OTP. Lastly, select the length of the OTP.
To resend OTP, under Mobile number you have the options of SMS, WhatsApp, and Voice channels. However under Email there it is the only channel available.
You can set the Resend count, Resend time in seconds and the OTP expiration time in minutes.(Min Required 15 min)

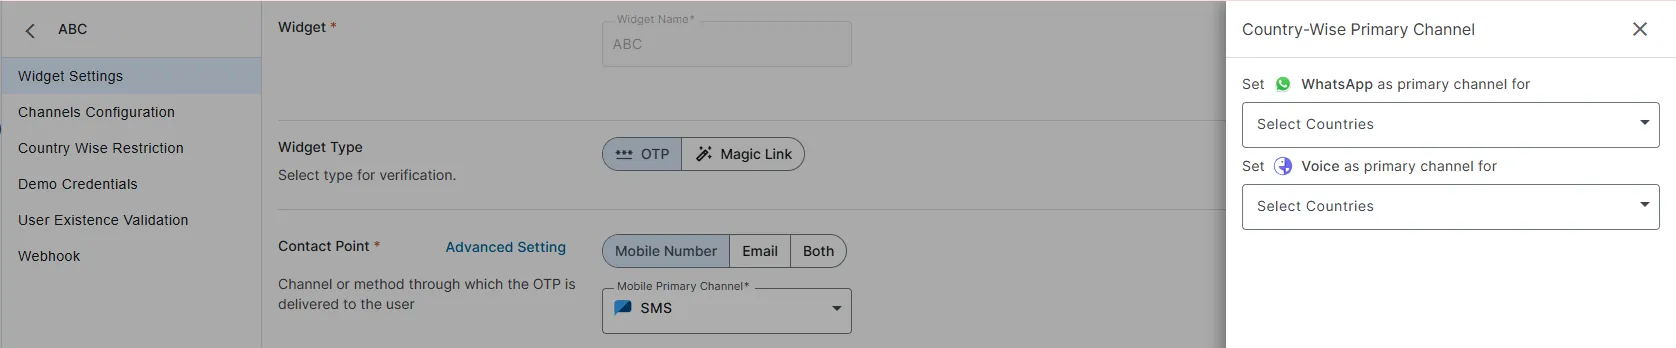
If you’ve opted for “Mobile Number” as one of the contact point then you can select Country-wise primary channel under Advanced settings tab (Multiple selections allowed). This feature is used to send OTP via different channels to different countries.
For Eg - If you want to send OTP to a country where sending via whatsapp is cheaper than SMS then you can select whatsapp as a primary channel for that specific country under advanced setting tab.
To create a new SMS flow, refer to this guide.
To create a new email template, refer to this guide. (You need to subscribe for email services and register your domain inorder to use email services or you can use the Connections option to send them via your gmail or outlook account.)
To create a new WhatsApp template, refer to this guide. (You need to subscribe for WhatsApp services by providing an active WhatsApp business number or a fresh number also must have balance in your Wallet to use WhatsApp services)
To create a new Voice template, refer to this guide. (You need to subscribe for Voice services and must have Voice balance in your account to use Voice services)
4. The Invisible OTP (Applicable only for mobile application) : We have introduced a new security feature "The Invisible OTP", which enhances security during phone number verification by sending an OTP without displaying it visibly to the user and verifying the same. If the Invisible OTP fails, it automatically reverts to using the Mobile primary channel as a backup for verification. This approach simplifies and secures the verification process without exposing the OTP directly to the user interface. For this feature to work you have to make sure that Mobile Integration is turned on.
Note : Once the verification is successfully done via Invisible OTP It will directly generate a JWT token at the backend for server side validation. Which will be provided to MSG91 to verify the user.
5. Mobile Integration : Enabling this feature will allow you to integrate widget in mobile, You must use our npm package. Please note that if you are using this feature then this widget will only work for mobile platforms and will not work on the web. By default, mobile integration is turned of
6. Captcha Validation : We've added a feature to our OTP widget that allows users to enable and disable Google re-Captcha validation. This option will be available in the OTP widget's settings, and it's designed to give you more control.
By default, re-Captcha validation is turned on, which is great for protecting your widget against bot attacks. Bots can cause problems by flooding your system with fake or automated requests, so re-Captcha is like a security guard, making sure real people are using your widget.
However, there's a unique situation to consider. If you're using our OTP widget in a desktop or mobile application, like an Electron app, re-Captcha might not work properly because it's meant for websites, not desktop or mobile apps
So, we're adding this option for you. By disabling the re-Captcha validation, you can use the OTP widget in your desktop or mobile app without any hiccups.

7. iFrame : Enabling this feature will allow you to access the widget in the iFrame window. By default, iFrame is turned off
8. Now, click on " Next." You will then add the template for the selected channel. Choose the template from the dropdown menu, map the variables.
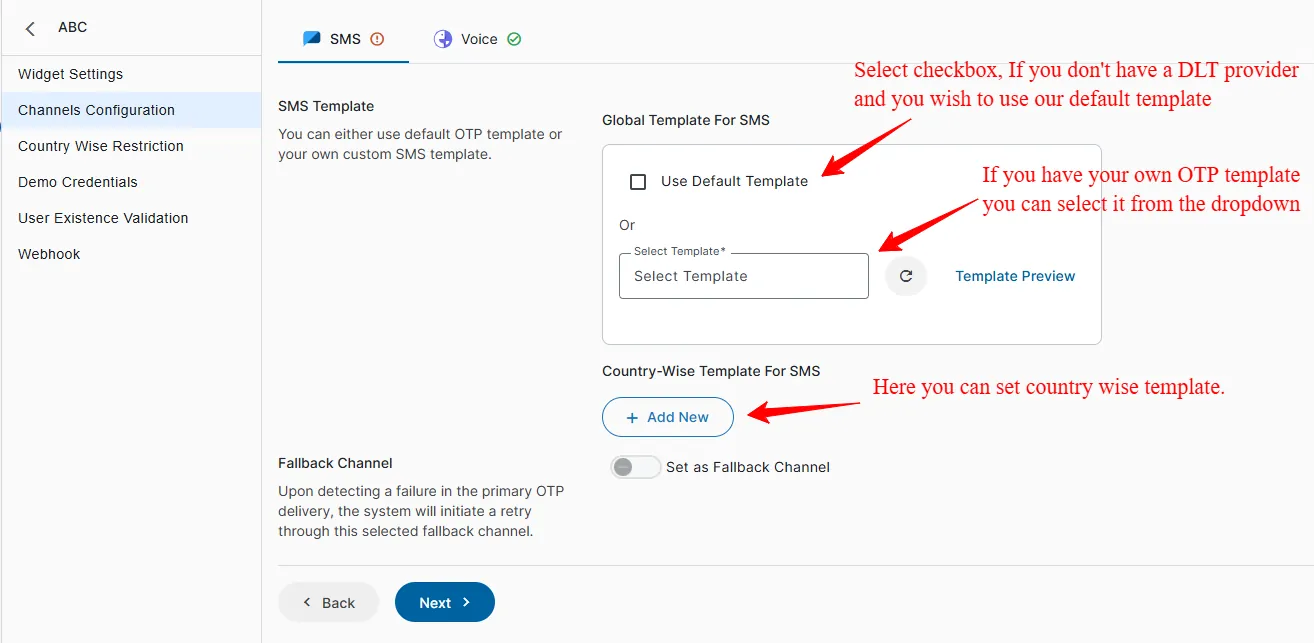
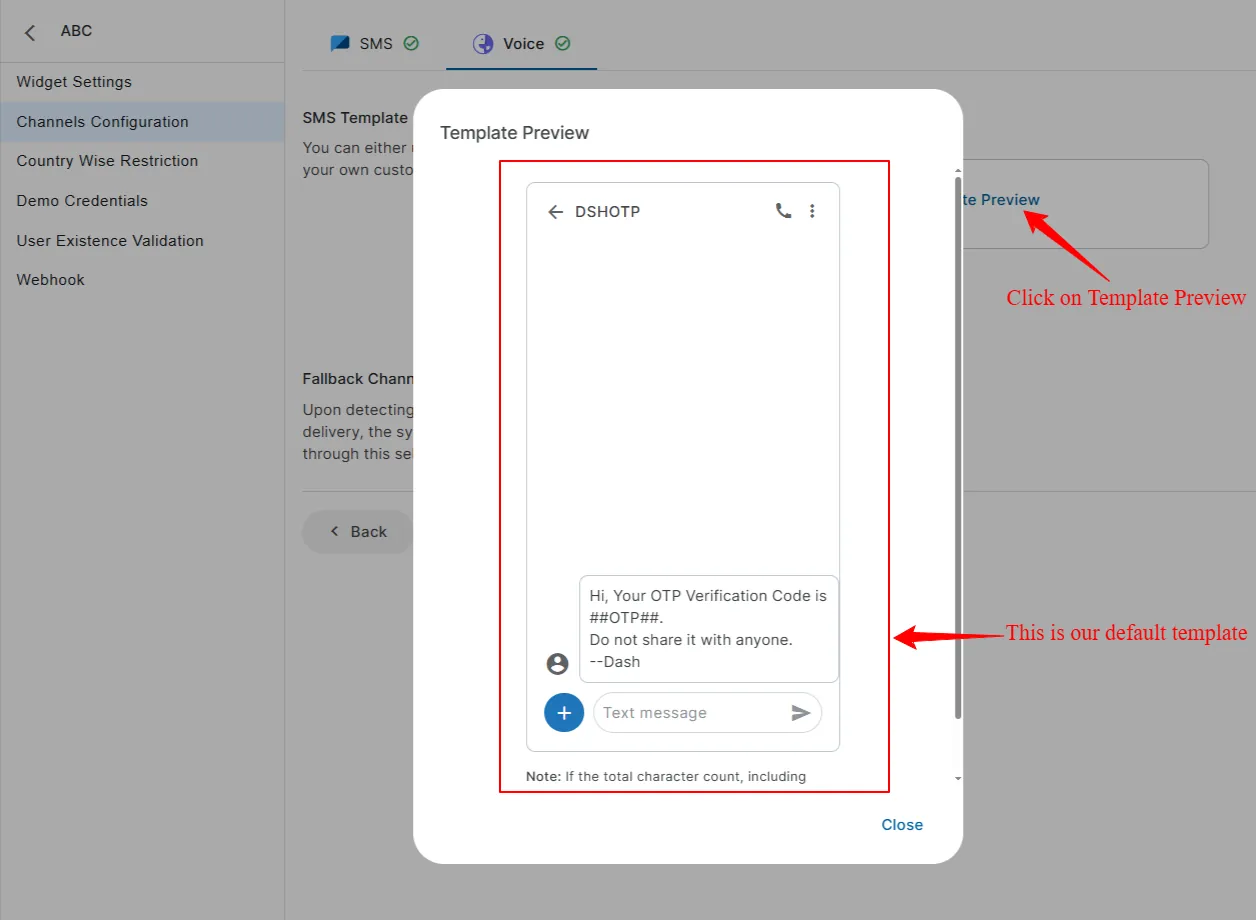
A default SMS template is being provided by MSG91 to use till your template is not approved on DLT.
Once done you can click on the Template Preview Button and you'll see a preview of the SMS or email that will be sent to the user.
9. For voice, you have two options : Global caller ID (Default caller ID according to the country) and Local caller ID (For this you have to first select a caller ID from the drop down as shown below and this will display a specified number selected by you).
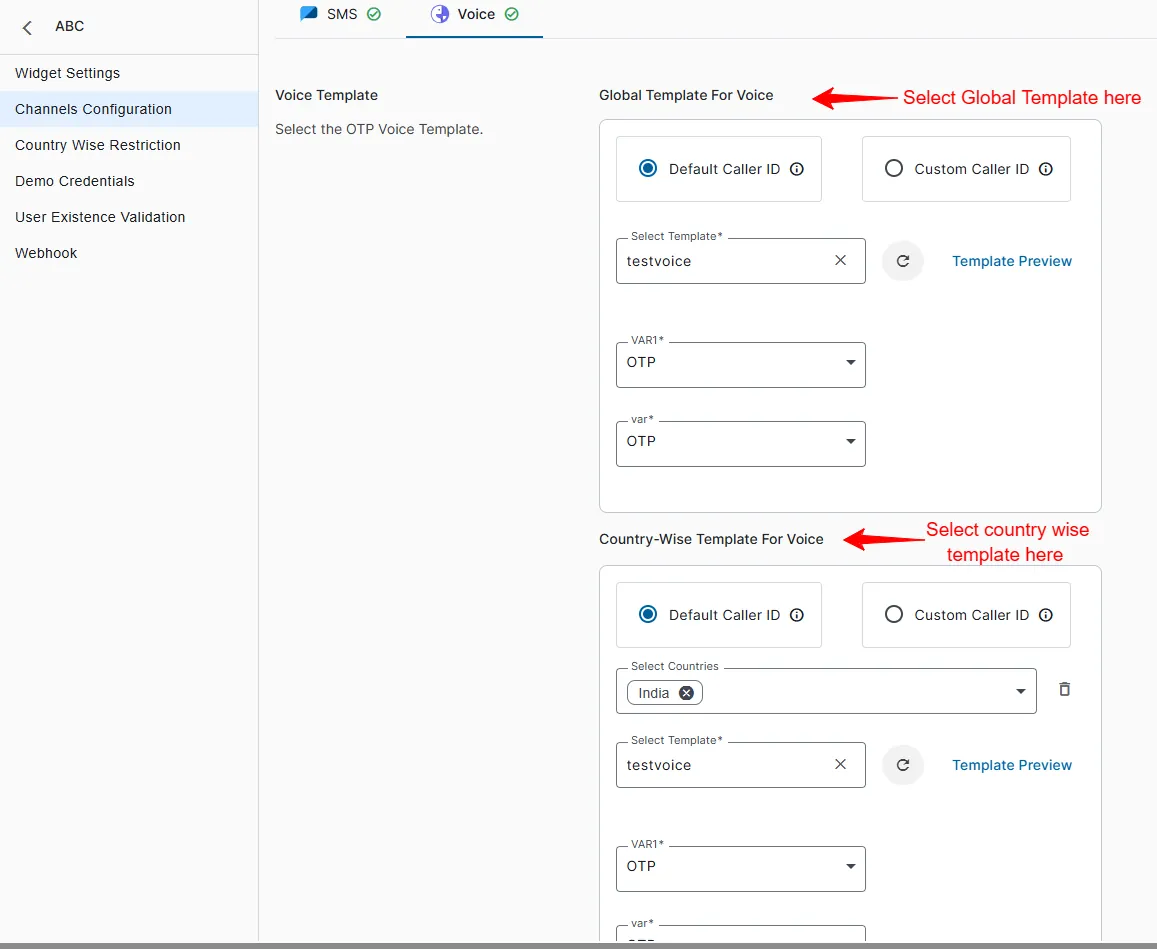
10. You can now select the template from the drop down or you can create a new template, which includes a preview for voice. After configuring the channel, click "Save & Next."
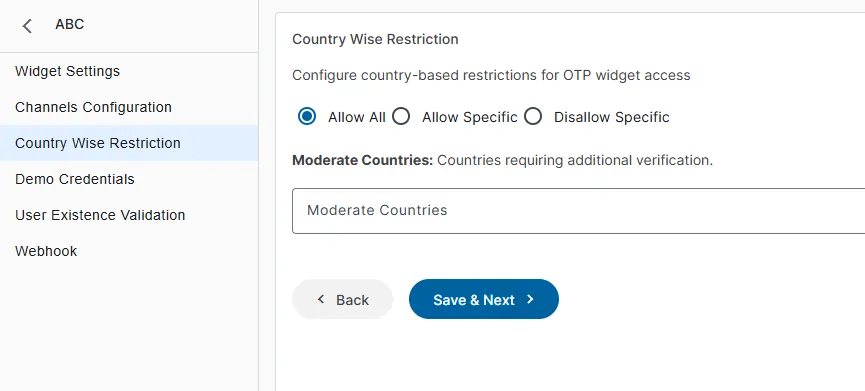
11. Country wise Restriction :- In the country wise restriction there are three options 1. Allow all (Which will allow all the country to send OTP) 2.Allow specific (It will allow some specific country selected by you to send OTP) 3.Disallow specific (it will work opposite to the allow country feature do, You can select specific country to not send OTP). Click “Save & Next”
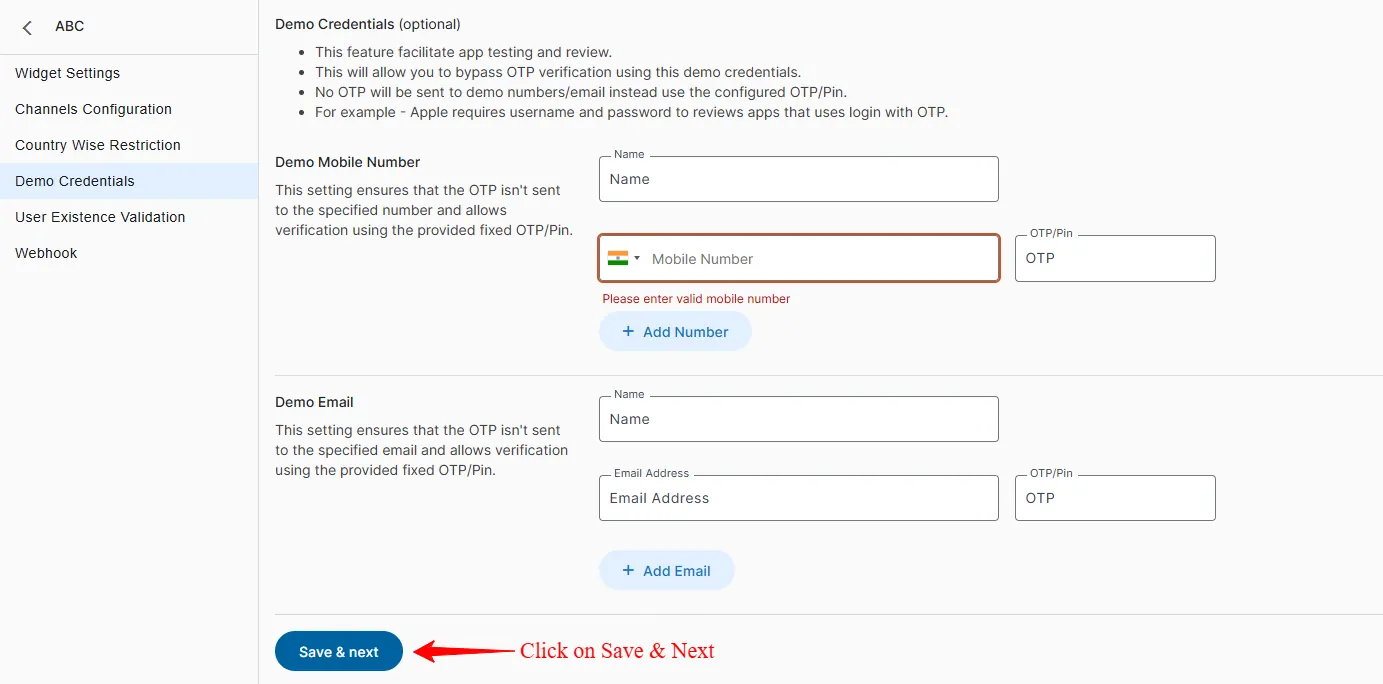
12. Demo Credentials: These are fixed credentials (Name, Mobile No, Email & OTP) which can facilitate app testing and review. It allows bypassing OTP verification as no OTP will be sent to the demo number/email instead the configured OTP can be used for verification.
For Example : Apple requires username and password to review apps that use login with OTP.
If you don’t want to add Demo credentials you can skip this step by clicking on the Skip button.
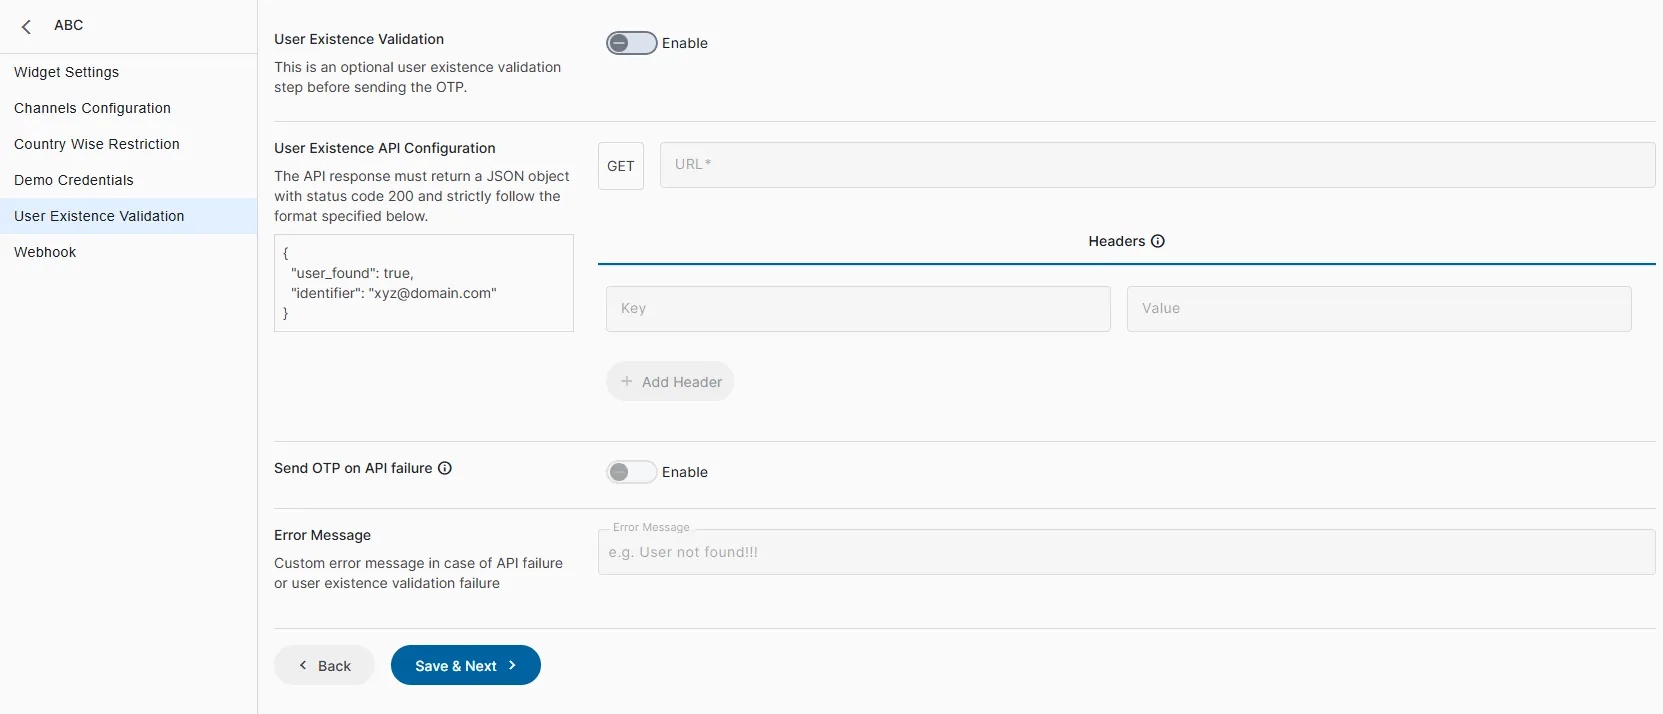
13. User Existence Validation is the process of verifying whether a user record exists in the system database before sending the OTP.
You have to add the configured API. Widget calls the configured User Existence API, If User exists :- Proceed with OTP sending.
User does not exist a. Do not send OTP. b. Show a configurable custom error message to the user.
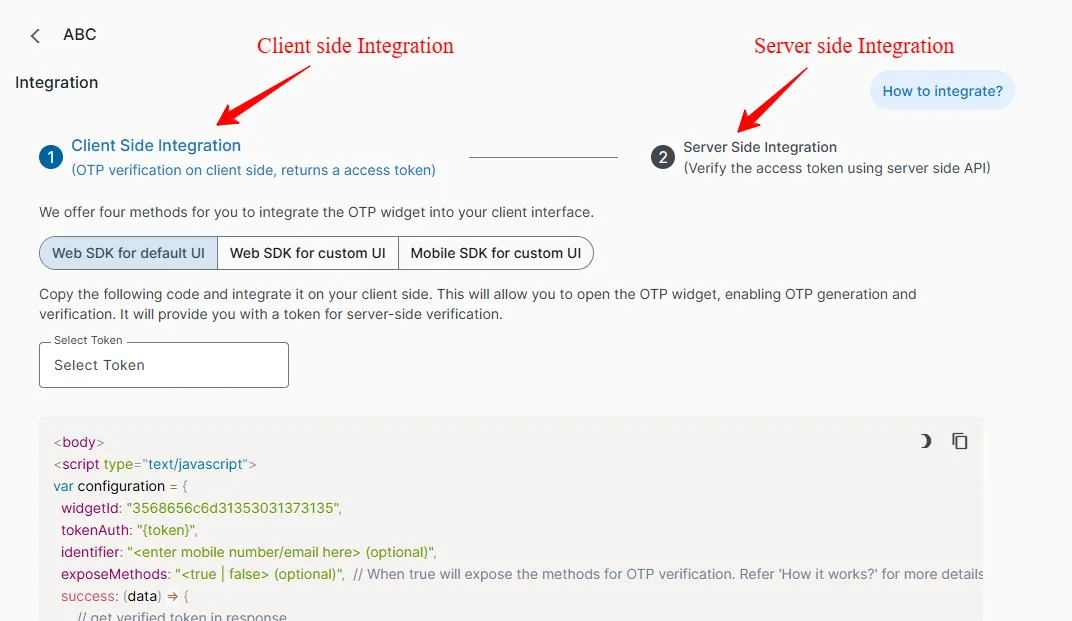
14. Client side integration : We offer three ways for you to integrate the OTP widget into your client interface (End user side).
Web SDK for default UI
Web SDK for custom UI
Mobile SDK for custom UI
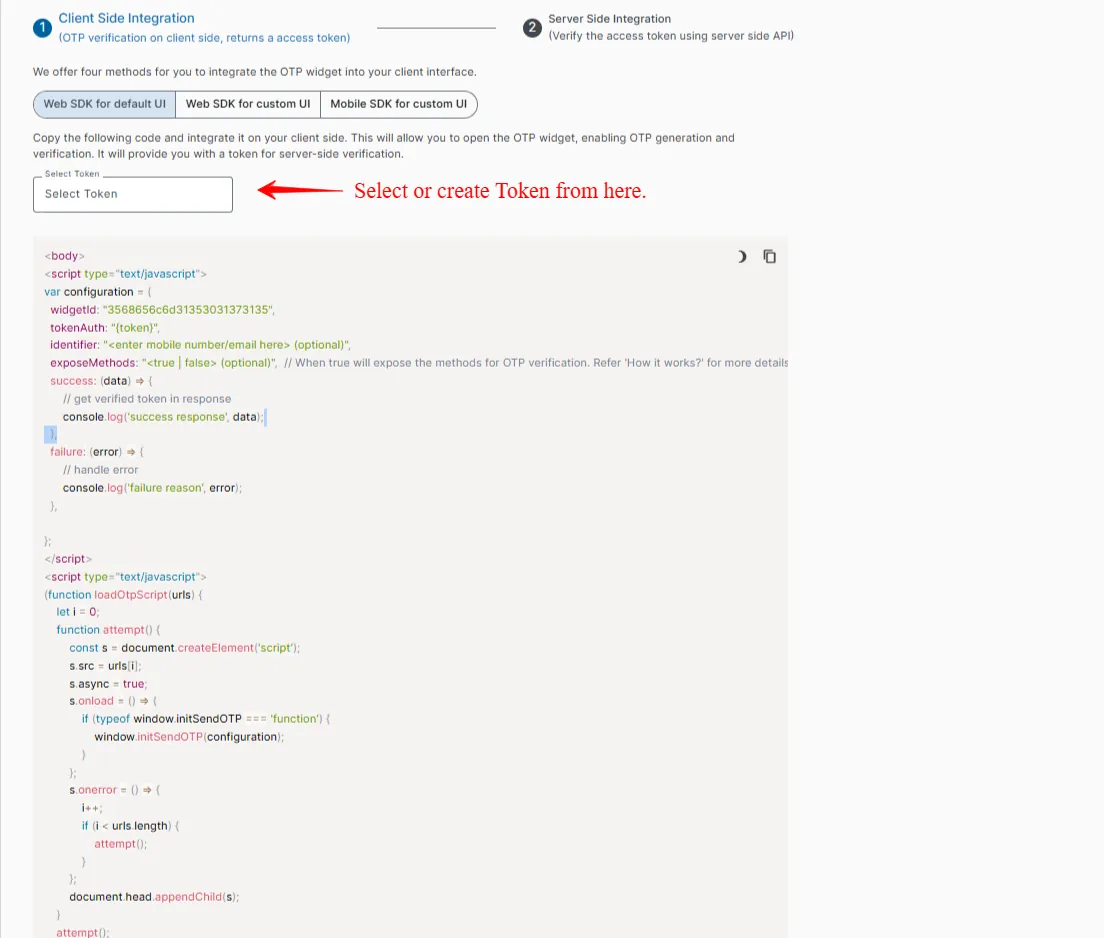
Enter the Auth Token of your account into the script and use it wherever you want to integrate the service. To obtain it, click on "Select token" in the dropdown menu. If no token is generated, you can create a new one from the "Token" section on the top left sidebar, by clicking on Create New Token. Please note that this token is exclusively generated for OTP Widget feature hence it is a more secure and reliable way of authentication as it helps us to keep the account auth key from getting public.
Note- In order to know more about Token, please refer: https://msg91.com/help/MSG91/what-is-token-and-how-to-use-it
In the script's success and failure parameters, input the location for displaying the unique access token for each user.
Once a user enters the OTP and clicks to verify, it generates an access token which you need to send to your server.

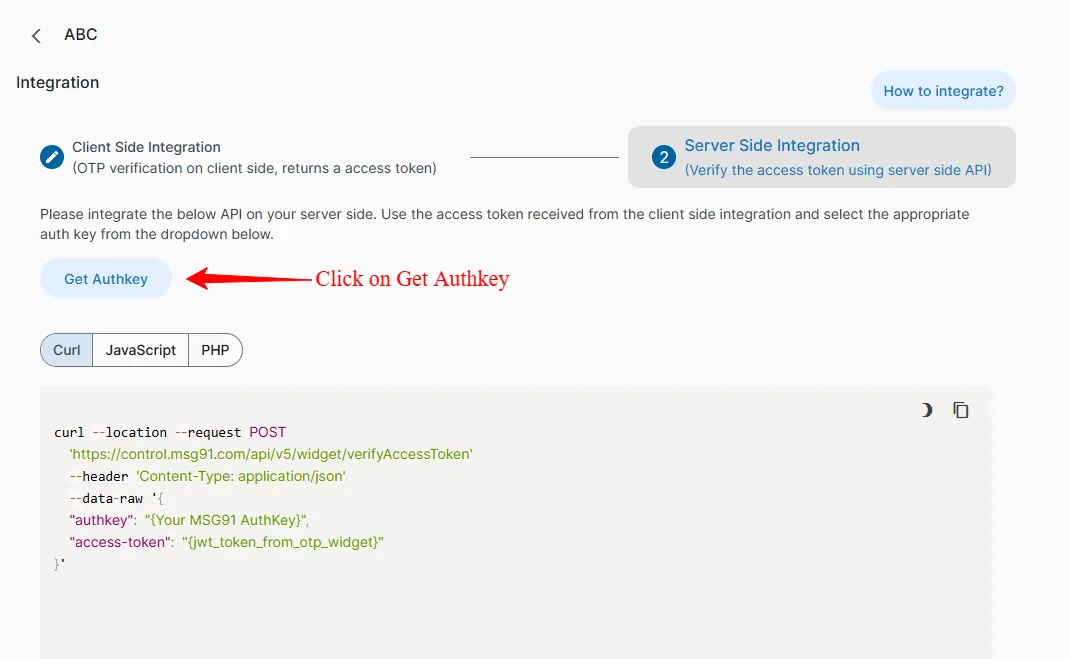
15. This access token needs to be sent to MSG91 through the API provided in the Server-Side Integration section, displayed in the image below. Select Auth Key (If already generated) or to obtain the authkey for your account, click the "Get Authkey" link under Server-Side Integration.
16. Logs : To check logs, got the Logs section available under OTPWidget/SDK header under the left menu. You can select the date range from the option available on the top right corner of the screen and click apply.
Also a Filter option is available in order to create different filters as per the logs that we want to extract. Under the filter we have different options to choose from.
Channel : Here we can either select all or else we have the option to select multiple channels.
Select OTP Widget : Here also we can select from the different OTP Widgets available.
Resent Count is : Under this we can select from different conditions like the resent count is Greater Than/Less Than/Equals to the value defined by us
OTP Verification Status : This will sort the data on the basis of verification done by the user as soon as they hit the verify button after entering the OTP. Here the status can be selected as either verified or unverified else we can select as both (Default Selection)
Access Token verification status : This will sort the data on the basis of verification done via Access token post the OTP verification at the users end. Here the status can be selected as either verified or unverified else we can select as both (Default Selection)
We can also see the User IP and Host under the logs. This is helpful to segregate the data as per IP or host from which the request is being received.
Export Logs : This option is available on the top left corner. Here we can select the date range and the fields (Header under which we want to export in the log file) and then click on Export.

After clicking on Export we have to wait for a few seconds in order for the log file to be generated and then we can download the log file from the Download section available under the OTPWidget/SDK header under the left menu. Click on Select Download type and select Logs from the dropdown and then click on download button.

Analytics : Inorder to generate Analytics goto the Analytics section available under OTPWidget/SDK header under the left menu. You’ll see Analytics on the screen. You can select the date range from the option available on the top left corner of the screen and click apply. Here you will see data grouped as OTP delivery/OTP Verifications/Channel-wise delivery.
Export Reports : This option is available on the top right corner. Here we can select the date range for which we want to export the report and enter the email address on which the analytics report will be sent. After that click on Export.

How to configure Web SDK Custom UI in OTP widget?
The following methods, SendOTP, VerifyOTP, and RetryOTP, are provided for authentication purposes. These methods facilitate the seamless integration of the OTP verification within your custom user interface.
1. ExposeMethods: Set exposeMethods to true within the config object in order to expose methods sendOtp, retryOtp, verifyOtp on window objects. Setting this flag to true will also not show the verification popup on the UI.
<body>
<script type="text/javascript">
  var configuration = {
    widgetId: "Enter_widget_id_here",
    tokenAuth: "{token}",
    identifier: "<enter mobile number/email here> (optional)",
    exposeMethods: true,
    captchaRenderId: '', // id(must be unique) of html element where to render captcha, only works if there is exposedMethod is true,.
    success: (data) => {
        // get verified token in response
        console.log('success response', data);
    },
    failure: (error) => {
        // handle error
        console.log('failure reason', error);
    },

};
</script>
 <script type="text/javascript" onload="initSendOTP(configuration)" src="https://verify.msg91.com/otp-provider.js"></script>
</body>
You can use pass the dynamic variable values in the same way as suggested in the Web SDK option for default UI.
2. SendOTP: This method takes an identifier (mandatory argument) & two optional callbacks for handling the success and failure scenarios. This method sends the OTP to the passed identifier. The identifier could be either an email or mobile number (it must contain the country code without +). If the API is successful then the passed success callback will be called to inform about the success. Same for the failure scenario.
window.sendOtp(
  '[email protected]', // mandatory
  (data) => console.log('OTP sent successfully.'), // optional
  (error) => console.log('Error occurred') // optional
);

// example: mobile number as identifier

window.sendOtp(
  '919999999999', // mandatory
  (data) => console.log('OTP sent successfully.'),
  (error) => console.log('Error occurred')
);
3. RetryOTP : This method is used to retry the OTP if the OTP is not received due to any reason. This method takes channel value as a mandatory argument and two optional callbacks for handling the success and failure scenarios.
If the widget is configured with the default configuration then the channel needs to be passed as null. For custom configurations, the following values can be used for the channel:
Sms: '11'
Voice: '4'
Email: '3'
WhatsApp: '12'
The channel value determines which communication channel will be used for resending the OTP. For eg:
window.retryOtp(
  null, // channel value mandatory
  (data) => console.log('resend data: ', data), // optional
  (error) => console.log(error), // optional
  '336870744532313134323444' // optional
);

// Custom configuration
window.retryOtp(
  '11', // channel value mandatory
  (data) => console.log('resend data: ', data), // optional
  (error) => console.log(error), // optional
  '336870744532313134323444' // optional
);
4. VerifyOTP : This method is used to verify the OTP entered by the user. This method takes otp value as a mandatory argument and two optional callbacks for handling the success and failure scenarios.
// For example

window.verifyOtp(
  123456, // OTP value
  (data) => console.log('OTP verified: ', data), // optional
  (error) => console.log(error), // optional
  '336870744532313134323444' // optional
);
Note: If you are listening to verifyOtp method's success and failure callbacks then you can skip the main success and failure callbacks provided within the config object. Otherwise, you will get 2 events of success and failure.
var configuration = {
    exposeMethods: true,
    success: (data) => {
      // You can ignore listening to this if the verifyOtp method's success is listened
      console.log('success response', data);
    },
    failure: (error) => {
      // You can ignore listening to this if verifyOtp method's failure is listened
      console.log('failure reason', error);
    },
  };
5. GetWidgetData : Another method exposed on the window object is getWidgetData, which returns the current configured widget data as obtained from the API.
var widgetData = window.getWidgetData();
console.log('Widget Data:', widgetData);
6.isCaptchaVerified :Another method exposed on the window object is isCaptchaVerified, which returns the boolean value true/false .
var isCaptchaVerified = window.isCaptchaVerified();
console.log('Captcha is verified or not', isCaptchaVerified);How to configure Mobile SDK for Custom UI in OTP widget?
Mobile SDK is available in various programming languages and the configuration is available in the MSG91 account itself.
React native
Flutter
Kotlin
Swift (Upcoming)
Jenkins (Upcoming)
React Native configuration
Step 1: Install the package in your project using the below command.
npm install @msg91comm/sendotp-react-native
Step 2: After successful installation of the package, you can import OTPVerification in your project. For example
import React, { useEffect } from 'react';
import { OTPWidget } from '@msg91comm/sendotp-react-native';
Step 3: Finally integrate the OTP verification using below code.
const widgetId = 3568656c6d31353031373135;
const tokenAuth = {authToken};

const App = () => {
    useEffect(() => {
        OTPWidget.initializeWidget(widgetId, tokenAuth); //Widget initialization
    }, [])

    const [number, setNumber] = useState('');

    const handleSendOtp = async () => {
        const data = {
            identifier: '91758XXXXXXX'
        }
        const response = await OTPWidget.sendOTP(data);
        console.log(response);
    }

    return (
        <View>
            <TextInput
                placeholder='Number'
                value={number}
                keyboardType='numeric'
                style={{ backgroundColor: '#ededed', margin: 10 }}
                onChangeText={(text) => {
                    setNumber(text)
                }}
            />
            <TouchableOpacity
                style={styles.button}
                onPress={()=>{
                    handleSendOtp()
                }}
            >
                <Text>
                    Send OTP
                </Text>
            </TouchableOpacity>
        </View>
    );
}

export default App;
For any further help reach us at [email protected].