
WhatsApp Number Integration - Onboarding
WhatsApp Onboarding Guide – MSG91 + Meta Business
Here’s the link to the WhatsApp Onboarding video guide in English for your reference:
https://www.youtube.com/watch?v=stKXcZCg5I8
Here’s the link to the WhatsApp Onboarding video guide in Hindi for your reference:
Step 1. Create a Meta Business Account
Log in with your personal Facebook account at business.facebook.com.
Create a Meta Business Account.
Please refer to this link for creating a Business Portfolio in Meta Business Suite: https://msg91.com/help/whatsapp/how-to-begin-with-whatsapp
Under this account, create a Business Portfolio and complete Meta verification: https://msg91.com/help/whatsapp/how-to-get-your-business-account-verified-on-whatsapp
_compressed.png)
Step 2. Log in to MSG91
Sign in to your MSG91 account.
Navigate to WhatsApp → Number tab.
Click Add Number.
You will see two options:
Add New & Migrate Number
Connect WhatsApp Business App Number (works with both the WhatsApp Business mobile app and Meta)
Step 2.1 New/Migrate Number Option:-
.webp)
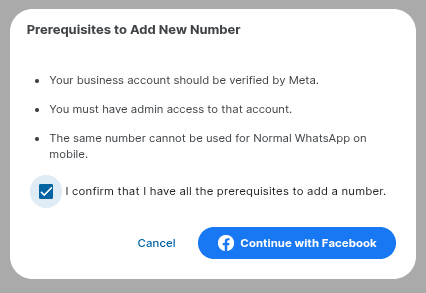
Requirements:
Your Meta business account must be verified.
You must have owner access.
The WhatsApp number you plan to use must not be active on regular WhatsApp.
Connect Your Meta Business
Select the Facebook ID that owns your verified Business Portfolio and click Continue → Get Started.
.webp)
Select the appropriate country code from the dropdown menu. Then, enter your mobile number in the provided field.
.webp)
Enter the OTP received on your mobile number and click on “Next” to proceed.
.webp)
Select the Business Portfolio and WhatsApp Business Account. If you want to create a new WABA, select “Create a WhatsApp Business Account.” Then, click “Next.”
Or, If you wish to create a new business portfolio then please refer this help doc (https://msg91.com/help/whatsapp/how-to-begin-with-whatsapp)
 (1).webp)
Review the Business Name, Category, Website URL, and Country, then click “Next” to proceed.
_compressed.png)
Click on “Confirm” and then click on “Finish” to complete the onboarding process.
 (2).webp)
Step 2.2 Connect WhatsApp Business App:-
Select the appropriate country code from the dropdown menu. Then, enter your mobile number in the provided field.
.webp)
Review and verify your account details. If the information is correct, proceed to the next step.
.webp)
Connect to the Business Platform
You will receive a message from Facebook, Open the message and click “Connect” → “Connect to the Business Platform” → “Share All Chats” → “Continue.” Then scan the QR code or select “Use Access Code.”
If you don’t receive the Facebook message: Go to WhatsApp → Settings → Account → Business Platform, click “Connect to the Business Platform” → “Share All Chats” → “Continue,” then scan the QR code or use the access code.
.webp)
Select the time zone: Asia/Kolkata, then click “Next.” After that, click “Confirm” and then “Finish” to complete the process.
 (3).webp)
Step 3. Set Up Wallet & Auto-Recharge
Before sending messages:
Add a prepaid amount to your WhatsApp wallet.
Enable Auto-Recharge to avoid message failures.
Example:
Set Threshold = ₹10,000, Recharge Amount = ₹50,000.
When the balance drops to ₹10,000, the system will auto-recharge ₹50,000 from your main wallet.
Click Save & Next.
_compressed.png)
Step 4. Optional: Enable Two-Way Communication
To use an AI chatbot for automatic responses, enable the Hello option.
Tick the checkbox and click Save & Next.
_compressed.png)
Step 5. Final Steps
Your WhatsApp number will appear in MSG91 and may take a short time to become active.
Once active, you can start creating and sending WhatsApp message templates.
You have successfully completed the Meta WhatsApp account onboarding process.
Thank you for connecting with us, and enjoy using MSG91 WhatsApp services!
_compressed.png)